
DISCLAIMER : as of sep 2025 the method described below will no longer work according to https://learn.microsoft.com/en-us/exchange/mail-flow-best-practices/how-to-set-up-a-multifunction-device-or-application-to-send-email-using-microsoft-365-or-office-365
Precursor
Imagine the following : you recently migrated your mail platform from the “classic” POP/IMAP mailbox setup towards Microsoft 356’s mail solution.
If you’ve done the M365 setup correctly and migrated everything towards your new cloud environment (see tons of previous posts 😉) you’ll soon run into some issues when trying to send an e-mail from your super-cool all-in-one printer/scanner/copy/fax machine, which is hooked up to the network and ready to send scanned documents in your (domain) name.
One of these issues being that you receive a NDR from your recipient relating to something like “Error 550 5.7.1 The user or domain that you are sending to (or from) has a policy that prohibited the mail that you sent” or anything basically that falls back to “we don’t trust this e-mail, because you smell of spam/phishing/malconfigured SMTP/…”
Your printer – in this example – still has port 25 and (for instance) uit.telenet.be as outgoing mail server (yes, I’m Belgian – hence the .be TLD on my site)
(PS : don’t want to read this entire story ? CTRL-F your way to “How do I set this thing up ?”)
Behind the scenes
What happened behind the scenes before and after your migration, concerning mail flow ?
Before your migration,
you used to have and old-school mail provider that allowed a lot.
Your recipients didn’t care much or already added your scanned mails with PDF’s in them in their white allow-list.
Maybe your mails got through, maybe they didn’t.
Your outgoing mail provider (let’s say it’s Telenet nv for the sake of the already mentioned example above) doesn’t really care what you send over their mail server, as long as you send it from an IP address on their network.
(a small note : at the time of this writing Telenet no longer accepts anonymous port 25; they need authentication through an @telenet.be address and use port 587 with TLS encryption)
(another small sidenote : Proximus still allows anonymous port 25 at this time *cough*)
Whatever the case, it would allow senders to send any mail they want from any e-mail address they want, as long as they use their own internet provider’s mail address.
After migrating to M365,
Microsoft kind of enforces you to add certain DNS records, before 100% completing the setup wizard of their Online Exchange offer.
✅ green ticks tick my own boxes as well, so as an OCD-enjoying IT guy, I can’t not complete this wizard :p
One of these records you have to create is an SPF record, which partly regulates the mail flow for your domain by defining. (more on the SPF record on [this page])
Microsoft is also kind enough to allow you to send over their own SMTP servers (good guy MS !!!) and provides certain regulations in order to be able to do so.
Server/Smart Host: smtp.office365.com
Port: 587
TLS/Start TLS: Enabled
Username/Email address and password: pretty obvi what this is….
In a perfect world, you’d be able to just enter these settings in your super-duper all-in-one printer and you’d be good to go. 👌
HOWEVER…
On the dreaded day of June 30, 2023 Microsoft disabled out-of-the-box support for a tiny little protocol we know as TLS.
Specifically, they disabled support for TLS 1.0 and 1.1 (fear not).
A lot of these printers use this “older” protocol and – as you might already guess – this complicates the entire sending-of-mail process.

Never fear, though !
Microsoft built in a backdoor/workaround in their own security enforcement and still allows you to send mails like you would in “days of olden”.
How do I set this thing up ?
We’ll take this random internet screenshot from the mail settings tab in an OKI printer as an example :
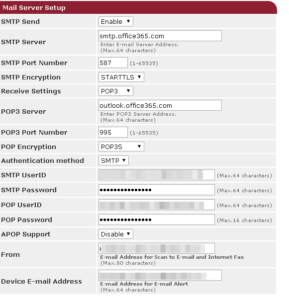
Following all instructions you find on the internet, this would be the way to go.
And it is.
Using these settings in 2024 will result in a “cannot send mail” error on the printer.
Did you misconfigure something on this printer ?
NO.
Here’s what you need to change on the Microsoft side :
- Through https://admin.microsoft.com browse your Users > Active Users and click the mail enabled user for your all-in-one device (Yes, you need to have a mail-enabled user for this)
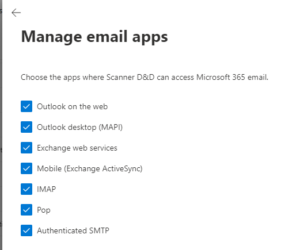
- On the screen that appears on the right, go to the “Mail” tab and click “Manage email apps“
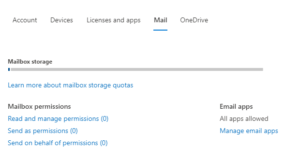
- By default “Authenticated SMTP” is not active.
Activate it and press “save changes”
- That’s not where it stops, though.
Microsoft, sneaky as they are, still disable SMTP AUTH on a more global level.
So just activating the above, will result in the same sending error on your device.
sooooo, let’s go to https://admin.exchange.microsoft.com for part 2 of the config. - On the Exchange Online admin center go to Settings (in the left) column and pick “Mail Flow” (not to be confused the the “Mail Flow” fold-out menu in the left column).

- One thing that needs to be de-activated is the “Turn off SMTP AUTH protocol for your organization“. (the tick needs to be unticked – super confusing option – double negatives and all)
Depending on the type of device, you may or may not need to opt-in the tick “Turn on use of legacy TLS clients“.
Even though Micro$oft disabled TLS 1.0 and 1.1, they still allow older TLS versions to communicate with the SMTP AUTH endpoint “smtp.office365.com”.

- Press “Save”, give it a couple of hours tops and BAM, send at will with your Brother MFC something something, your mail enabled camera system, CRM software, …
I’ll leave the “plus addressing” tick for you to Google. It’s a cool feature, with little use-case.
Still cool though.
I haven’t talked about using an account that uses MFA, where you could use “app passwords” up to 2024, but due to security reasons Microsoft is discontinuing this feature
Peace out.
Happy mailing !