Imagine coming from an obscure mail system in which you got a couple of public folders, such as a Public Address Book (not to be confused with the GAL – Global Address List) or some public Agenda.
Basically, this could also be a non-obscure system, as even the most generic or widely-used mail systems provide this functionality.
Having heard so much about Office 365, you decide to take the leap towards the cloud and start migrating all you mailboxes, only to find no default out-of-the-box public folder.
Fear not, as the functionality is still there. Even though it was rumored Microsoft was going to stop support for public folders in an Exchange environment. User pressure caused M$ to re-evaluate their choice, thus public folders are here to stay (at least for 3 years minimum). This also applies to Exchange Server 2016, by the way.
Howstuffworks.com
I’m going to assume you follow the necessary steps to set up a working O365 environment
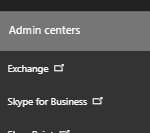
In the admin menu
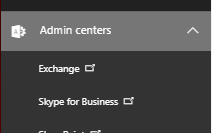
Open the Admin > Exchange menu in your O365 admin page
Once inside the Exchange Control Panel, select ‘Public Folders’ in the leftmost menu or on the dashboard.
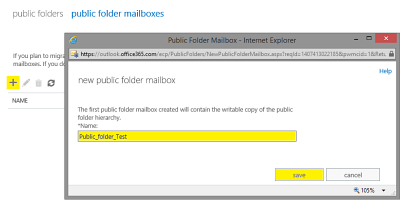
A new menu will appear, where you are to select “Public Folder Mailbox” in the topmenu.
For some reason yet unknown to me, you have to create a public folder mailbox first before you can actually create a public folder.
One would expect this to have all of this process automated…
Oh well, best go with the flow.
Click the little “Plus” icon and fill out the necessary info.
Once this is done, you get to create the actual shared folder in that same top menu, by selecting *insert drum roll* “Public Folders”. Click the little “Plus” icon in order to start creating your first Public Folder and name it as such.
Click save and *BOOM* your folder has been created.
Now you should be assigning user rights to this folder, as you’re not going to be admin’in this folder yourself as global admin for this O365 tenant.
Ideally leave the administration of public folders for contacts, agenda’s etc. to the end-customer as this is a specific task for a specific kind of manager. If you’re reading this as the IT guy/girl for a small company, you’re probably screwed and get to do this task yourself.
Click the newly created folder once so that the focus is on its name and next click on “Manage” in the right column.
You can choose who you want to allow specific rights to this folder, by clicking the necessary rights ticks or selecting prefab permission levels in the dropdown menu.
Press “Save” when done.
Actually creating contacts
Start by opening Outlook as a user that has owner rights (or sufficient rights to create folders) to your public folder and go to “Folder View” (that’s the three little dots in the bottom of your left column, in case you don’t have a 4K screen)
Next, open the new public folder by expanding “All public folders” until you’ve reached your root folder (which should just be one click, normally)
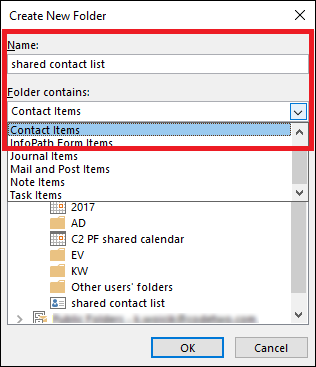
Right click the root folder and select “New folder”, after which you give it an appropriate name and select “This folder contains Contact Items”
As you see, other options are available, such as a public agenda etc.
We’ve already set the rights for admin, but as an owner, you can easily set other user’s rights afterwards through Outlook, instead of having to run over to your Exchange Control Panel as the global admin user.
In any case, you can right click your newly created folder, that will now have a Contact icon and select “Properties” …where you can tick the option “Show this folder as an e-mail address book”, so that Outlook (and you mobile as well as webmail) will be able to display this list for you to search through.
Confirm with OK.
Clicking the “To” button in your Outlook, will now let you select your newly created address book.
Everybody happy !
Now either import your PST file from the previous public contact list or start typing.
Good luck !
Many thanks to Peter from Kalmstrom.com for providing the necessary ‘missing links’ in my to-do list. I also shamelessly took the imagery from his website, as my own O365 30-day demo was expired ;). In my defense, it looks like the Pakistani Rimza.com domain in the example is possibly not Peter’s domain either :p
You didn’t think I was going to let you start a migration process without making you read the detailed “how and why”, did you ?
There’s a couple of migration types to keep in mind, where one is easier than the other.
Usually the more difficult one is also the most interesting one, but even this is dependant on specific needs.
Remote move migration
Staged migration
Cutover migration
IMAP migration
PST import
The last one (PST) is in most cases forgotten as an official way, since it’s possibly way too simple in Microsoft’s eyes.
As the target audience for this specific blog post is the average Belgian SME with an average of 5 to 20 employees, I’ll stick to the basics in this post.
An other post will cover the heavier subjects in a nearby future (aka ‘when I feel like it’)
PST Migration (1)
Difficulty level
Microsoft has this pretty cool tool to either upload PST files to a temporary Azure storage or to actually send them a physical copy by mail (yes, snailmail)
It’s a bit out of the scope of our average situation here, but know that such a method exists.
It will require the use of the program AZCopy, which is well explained in the link above.
Check it out if you want to look like a cool IT guy in the eyes of your customer 😉
(although Powershell is still the way to go if you really want to impress your customer)
PST Migration (2)
Difficulty level
Being a ton easier and providing more oversight than the PST Migration above, the ‘basic’ PST migration will have the average end-user require/demand your presence more often.
Although remote tools like Teamviewer/LogMeIn/… have made the life of the IT’er a lot easier, there’s got to be a bit of physical contact every now and then. This type of migration will give you the opportunity to sit down and explain Office 365 to your users while the data is slowly uploading through MS Outlook.
Grab some coffee and get your hands dirty as this type of migration will get you closest to the actual customer’s computer than any other.
Try to avoid using this migration type, when the customer has an IMAP mail account you need to move to your O365 tenant, as often IMAP saves the mail headers, but not the mail an sich, resulting in a very empty mailbox in the end.
Now, how does this process work ?
Pretty easy :
First of all, get your mail users to stop using their mail for a while.
Preferably redirect the mailflow, by use of the MX record we talked about in this post, already 24 hours before starting your PST import, to make sure no trailing mail gets left behind on a mail server you won’t be able to access anymore after migrating.
If you’re really sure that the mail is good to go, the easiest way would be to locate the current location of the PST files. https://www.msoutlook.info/question/827 explains this quite well.
Keep in mind that the PST files aren’t always in their default location. Some customer prefer to save their PST files on a network location or redirected folder.
If you happen to be the IT guy that implemented this specific setup, shame on you. PST files will get corrupted by just looking at them. Placing them in a network drive, will only make things worse.
No PST file found ? No problem !
There’s a possibility that your user has disabled ‘cached mode’ in Outlook (often occurs in cases of local desktop computers in connection with an Exchange Server on that same location)
In that case you’re more likely to find OST files or something similar.
The ‘clean’ way to go here is to start a simple PST export procedure in Outlook
Seeing as reinventing the wheel is not my hobby, here’s the link to the Microsoft article that explains how to do this : https://support.office.com/en-us/article/export-or-backup-email-contacts-and-calendar-to-an-outlook-pst-file-14252b52-3075-4e9b-be4e-ff9ef1068f91
Writing walls of text is one of my hobbies, though ^_^
Once you’ve gotten hold of the PST files, there’s a couple of ways to get them in Office 365, but seeing as I already advised to stop your users from using their email for a while, you get to strike while the iron is still hot.
The easiest way is to create a new Outlook profile.
Mac users : check this out –> https://support.office.com/en-us/article/manage-profiles-or-identities-in-outlook-for-mac-fed2a955-74df-4a24-bef6-78a426958c4c Windows users : Open Control Panel, go to Mail (32 bits or no reference to the number of bits, depending on the version).
Afterwards, click ‘View Profiles’ and add a new one.
The ‘new account‘ wizard starts, where you can simply enter your new mail address (given you’re not migrating from a local Exchange server on your own domain – more on this later)
Outlook will start and an empty mailbox or even a partly filled one will appear. Depending on whether you changed the MX record already or left it unchanged.
Eventually, change the default profile to your new O365 one.
Repeat x times where x is the number of computers where Outlook is running the old mailbox.
IMAP migration
Difficulty level
The difficulty level could vary depending on the version of the IMAP server, but the thought train runs on that same track. (did I just invent a new proverb ?)
First of all, let’s take a look at this schema below, which explains the process of migration quite neatly and in an understandable manner.
Thanks, Microsoft, for this overview.
If you’ve followed our current steps in the previous posts, we’ve already established the steps up to the creation of the mailboxes, which starts us at step 5. isn’t that tidy ?
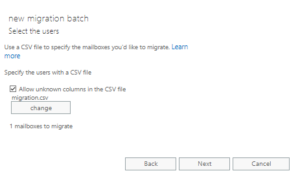
You need to create a specific CSV file, that we’re going to use in our migration batch.
Usually it will suffice to base yourself on this template, but there are exceptions for Exchange, Dovecot, Mirapoint and couple of weirder ones.
The general idea behind this CSV file is to provide the mailbox address TO which you need to copy the content of the IMAP folder, together with the username and password of the ORIGINAL IMAP mailbox, where the mail is currently residing.
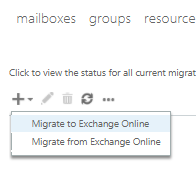
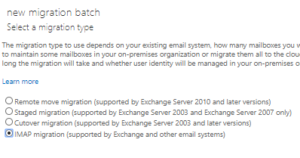
You can start the migration in the O365 Exchange Control Panel, by going to ‘Recipients’ and then clicking ‘Migration’ in the topmenu.
Click the little ‘+‘ and select ‘Migrate to Exchange Online’
Select ‘IMAP migration’
Upload your CSV file and allow unknown columns
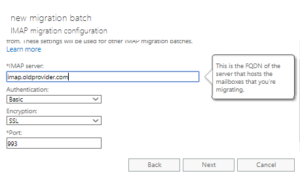
Enter the IMAP server data and means of authentication of your old provider
Pressing ‘Next’ will start the initial setup.
The migration top menu will provide you with more information on how your migration is going. You can click the migration batch and review potential errors or view the overall progress.
A picture’s worth a thousand words, so I’m guessing a Youtube video will be worth at least “De Leeuw van Vlaenderen” :
Every IT related action has a counter-action that results in something going wrong.
Keep Murphy’s laws in mind, especially the computer-based ones.
Oh no! I lost my contacts.
First of all, wear glasses.
Second, they’re not your contacts. They’re your autocomplete list in the to-field
Third, you might have used the global address list instead of your own contact list.
Still found no contacts ? Have you imported from a different folder language of Outlook ? Check ‘all folders‘ and see if you’ve got an other ‘Contacts’ folder somewhere (check for specific Contacts icons)
Also, an IMAP migration does not cover contacts (or calendar or tasks for that matter, import them using the PST method, while excluding mail)
I can’t send an internal mail after the O365 migration.
Actually, you can, but you’re still using the wrong address in the background.
Your to-field might say ‘my_colleague@mydomain.com’, but in the background it’s saved this entry as a unique ID (especially when migrating from your own local mail server).
The solution : delete this user from your address book/autocomplete list and type the address manually.
I didn’t have Outlook before migrating. How can I create this new profile you speak of ?
2 do : tools for migrating from other crappy software
My PST file will not import (/partly).
Most common reason is a corrupt PST file. Fix it using the scanPST tool.
Corruption can happen if you save your PST file on a network drive or if a specific mail is being a d*ck. ScanPST will solve this.
An often overlooked reason could also be not having enough space in your new O365 mailbox. In this case you might have to upgrade the O365 subscription for this specific user with extra space or clean up the mailbox before doing the export to a PST file.
Very big mails don’t get IMAP-migrated.
This is normal. IMAP migration supports email size up to 35MB/mail
I had a sh*tload of mails in my old IMAP folder and now some of them are missing.
If you had over 500.000 mails in your old IMAP box, this is bound to happen as number of maximum items you can migrate in one batch is limited to 500.000
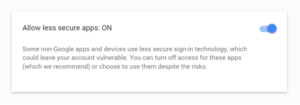
Migrating from Google to O365 is constantly failing. What am I doing wrong ?
You haven’t google’d enough.
No, seriously, there’ s a security setting you must turn on in your Google Security Settings :
You’ll find this here : https://myaccount.google.com/security?pli=1#signin
In our previous post, we’ve set up everything so we’d be able to start creating the users and their respective mailboxes.
If at this point you’ve already changed the mail server name in the domain’s MX record to that of the Office 365 one, remember that actual mail might already be arriving (or bouncing) in the O365 environment, so be cautious of this, when migrating a live situation.
A small recap below in case you forgot our intended setup :
Veritas !
If you’ve been paying attention in the previous posts, you’ll know we will be needing to create three users here :
Oliver
Annie
John
All other mail related stuff will be handled with mail groups or shared boxes.
Remember : the Microsoft licensing system in O365 is user-based, not computer-based.
Let’s start off with creating these three accounts.
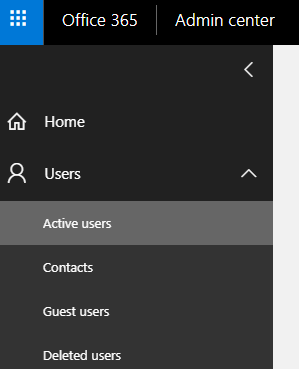
Open the Office 365 admin portal and open the “Users” menu, and then select “Active Users”.
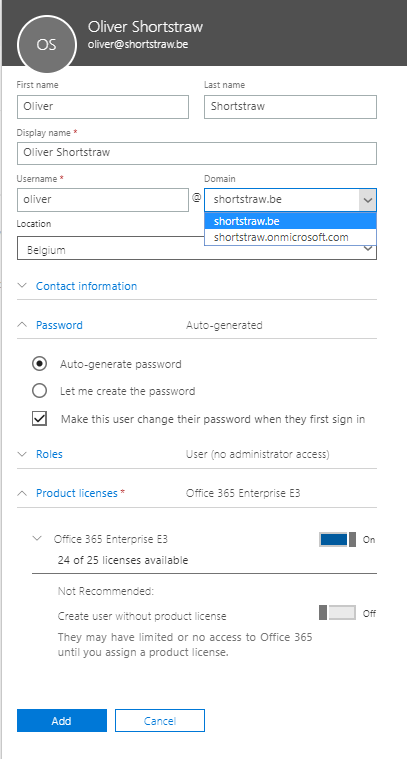
Next, Click the “+ Add a user” button and a small form appears.
Creating a user
You’ll notice a couple of things in the user creation form (except from the obvious things of course) :
The domain field shows your recently added domain as well as the onmicrosoft.com tenant name.
This means that you’re not obliged to actually use a domain name in an O365 environment. When going for mailboxes, it’d be stupid/silly/… not to do so.
Password generation : either let Microsoft generate a password for you that complies with the O365 password policies or type one for yourself.
You can also allow the user to be able to change their password on first logon.
Make your choice depending on the end-customer’s needs.
After confirming the user creation, you’ll also be given the option to send the credentials to an email address of your choice.
Roles : by default, new users will be given the “User” role, which allows for basic usage of the O365 environment. Other roles can be “Global administrator” or a custom mix of rights.
For more info on the different types of admin rights, see this Microsoft page.
If you’re ever to go and do a Microsoft exam on O365, these roles will pop up more than once in the questions list.
The Roles parts also allows you to fill in an alternative email address, instead of the user having to do this. Purely intended for password retrieval purposes.
Product licenses : in the O365 demo you’ll be given 25 Enterprise E3 licenses.
Depending on your user’s needs, provide the correct licenses by clicking the slider next to the license name.
Creating an user without a product license, which is also an option, is ill-advised and used in only a few specific situations.
Click the “Add” button and you’ll be greeted with the send-password screen asking you if you need to send the password in case you forget to write it down.
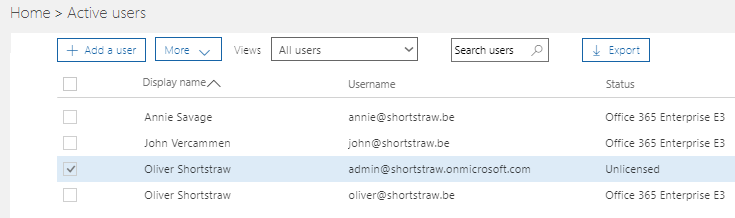
Repeat for all the necessary users.
In this case Annie and John will be created in the same way.
Remember to remove the admin’s E3 license for good measure. (but keep him admin !!)
In this demo environment, it doesn’t really matter, but you don’t want your customer to be paying for an unused license.
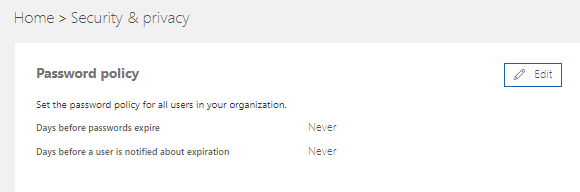
Just a tiny heads-up : if you don’t want your users to be calling you every 90 days, you might want to perform the small task of changing the Password policy.
Go to Settings > Security and Privacy and change password policy to “Never expire” and “Never notify” by clicking the “Edit” button.
The spice must flow. So must the mail
Well, that didn’t seem so difficult, right ?
Office 365 has automatically created a mailbox already for your users, in the background.
The system knid of predicted that you’d be wanting a mailbox for your E3-licensed users, as otherwise it wouldn’t be logic that you’d provided them with such a license. Of course there’s still some things that need to be done, so let’s have a look there.
There are two ways to edit mailbox properties.
The easiest, but with the least fancy options is through the same “User” menu we used to create the users themselves.
The second option is through the Exchange Admin Center.
Let’s start with “easy mode” :
Click the user in the Active Users menu and his properties will appear in an overview.
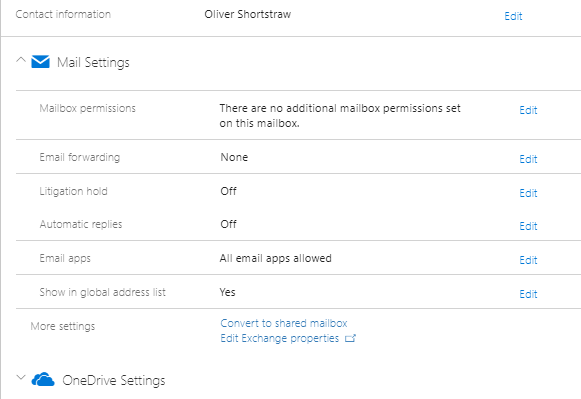
One of the options visible will be “Mail Settings”, where you can set up a couple of things :
Mailbox permissions : literally what it says. Allow others to have specific access to this mailbox. We’ll get into more detail when we reach a shared mailbox.
Email forwarding : allows you to *drumrolls* forward your user’s mail to another mailbox, with the option of leaving the original mails in your O365 box.
External mailboxes (unrelated to your O365 tenant) are also possible recipients.
Litigation Hold : allows for items in the mailbox to be retained even if the user deletes them.
Pay attention that this can increase the size of your mailbox significantly.
More info on litigation can be found on this Technet article.
Automatic replies : I don’t believe this needs much explaining.
Can also be done through the user’s personal settings in either Outlook or throught https://outlook.office365.com and preferably so. If you need to manage all your customers’ mailboxes and set their Out of Office message yourself, you’d best be charging by the hour.
Email apps will provide you the option of disabling certani ways of connecting to the O365 mail system. I can imaging you might want to disable POP ad IMAP for instance. It depends on the specific needs, however.
Show in global address list sets visibility of this mailbox in the address list when browsing through your company contacts. Usually you’d want this setting to remain untouched. Only in certain cases (for instance a logging or journaling mailbox) will this be a good choice.
Converto to a shared mailbox basically unlinks the mailbox from a user license and changes it to an mailbox which is only visible through an other O365 account within your tenant.
Edit Exchange properties opens the “hard mode” Exchange Admin Center screen, which we’ll discuss in more detail next.
The Exchange Admin Center is actually the way to go when you want to configure your mail environment in more detail.
It’s also a lot more fun to fiddle around in and it will give you a more general idea on all the mailbox features.
For all on-premise Exchange server admins with experience in 2013 server or higher : you’re in for a treat as this is an almost-perfect copy of the “Exchange Control Panel” with just a tiny difference in some functionality. You can probably skip most of this part.
Even the URL is similar : https://outlook.office365.com/ecp/
Information overload
Don’t be startled by the amount of clickable options in the Exchange admin Center.
We’ll cover the basics, under the “recipients” section.
Have a look around in the other options, but don’t change anything for now.
For your ease, click the Recipients link in the left menu.
This will show us six options in the top menu :
Mailboxes : an advanced view per mailbox for setting up rights, mailflow, aliases, …
Groups : allows for creation of either a fixed ditribution group, a security group or a dynamic distribution group. The dynamic groups are actually quite fun to play around with. They set up a mail-enable group depending on certain variables such as company name, department, …
Resources are practically identical to shared mailboxes, with the difference that they have a fancy looking icon. Resource mailboxes have the purpose of creating a mailbox (more preferrably a calendar) for your hardware.
If Oliver Shortstraw has a meeting room and a shared car, he might benefit from giving these items a calendar of their own (it’s free, anyway) so managing whoever needs to borrow the car or use the meeting room becomes a super-easy task.
Contacts : if you were to use external email addresses in tenant-wide mail rules, they need to be defined in this area.
“Mail contacts” are used for administrative purposes only.
“Mail users” are Active Directory enabled objects linked to an external mail address, allowing external users (like a gmail user) to perform things inside your cloud AD environment.
Shared mailboxes : as mentioned before, these mailboxes host mail, but aren’t linked to a physical user, thus not accounted for during licensing cost calculation.
Migration. I’ve always found this option to be somewhat misplaced in the recipients menu.
The “Migration” option oviously lets you migrate to (and from !) Exchange Online through a couple of ways.
We’ll be doing the second-to-easiest migration later on, as we’ll be importing shortstraw.be mail from the current provider over an IMAP migration.
In case you’re wondering : importing PST files in Outlook is the easiest way.
Mailbox properties
Let’s start alphabetically and have a look at Annie’s mailbox.
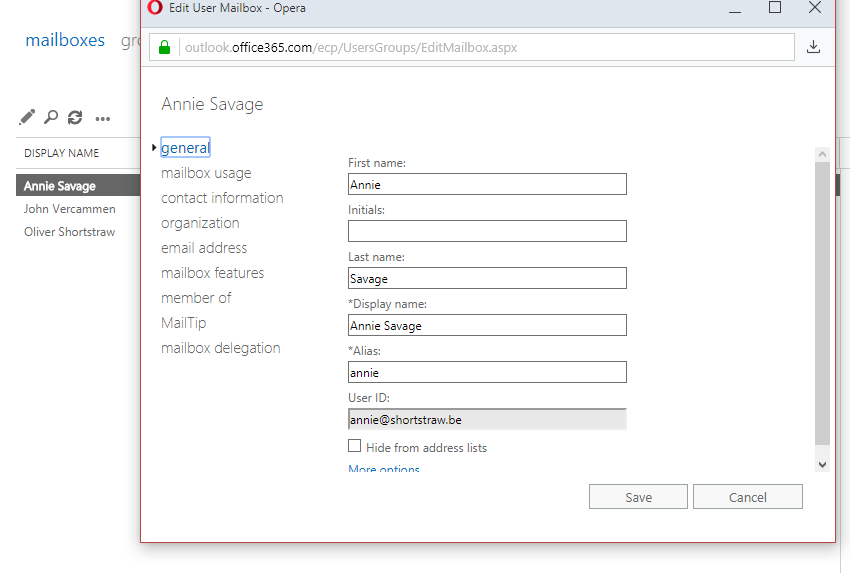
Doubleclick her entry in the Mailboxes part of the Exchange Admin Center
Annie, are you OK ?
The more important options in this popup window (allow popups in your browser for this to work, by the way) aren’t the ones you see at first.
Except from the “hide from address list” check mark, you can safely move on the “email address” menu for now. Feel free to have a gander at the other options.
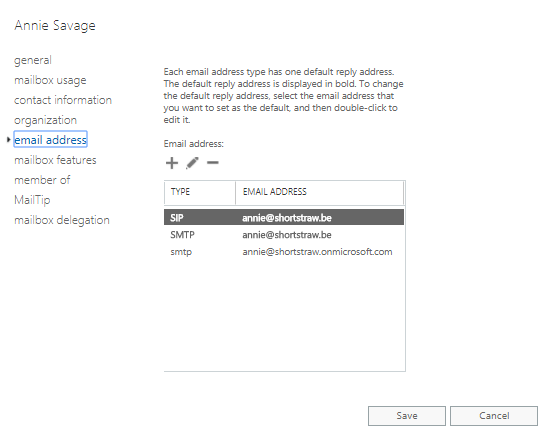
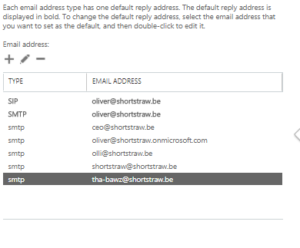
You’ll see three entries by default, after having created a user with only one domain attached to the O365 tenant :
SIP : used in Lync/Skype for Business/Teams (the communication part)
SMTP (in uppercase) : the default address, by which all outgoing mail from this mailbox is sent. Also called the “reply address”
smtp (in lowercase) : an alias to the mailbox. Mail sent to this address will appear in the mailbox as well. Replies will be sent from the SMTP address.
In our example, we’d like for Annie to receive cfo@shortstraw.be as well.
This can be easily achieved by clicking the little + icon and filling out the form, where you type the complete e-mail address and pressing the “Save” button.
You can edit here if this new address needs to become the reply address.
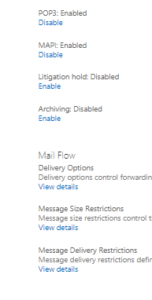
Mailbox features holds a plethora of options such as disabling the use webmail, denying mobile phone connectivity, litigation (see above), archiving, …
The part I want to focus on is “Mail flow” (scroll down a little in the list or enlarge the window).
Again, feel free to check out the other options as well.
Click mail flow and a new window will appear where you get to fill out another form.
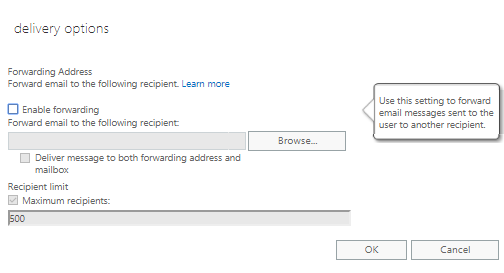
Forward, march !
Pretty straightforward option where you can setup a server-side mail forwarding, without Annie knowing about it.
For legal reasons I’m obliged to tell you that you should inform your users of this forwarding rule.
Ticking “Enable forwarding” enables you to click the “Browse” button, which in its turn shows you the list of available users to select from.
You’ll see that this list is populated only by the internal addresses in your own global address list.
And this is where our “Mail contacts” from above come in of oyu’re to setup a forwarding to an address that’s not housed in your customer’s O365 tenant.
“Deliver message to both forwarding addresses and mailbox” simply does what it says. If you weren’t to activate this after enabling the forward option, Annie wouldn’t receive mails anymore in her own mailbox, but all mails are forwarded without leaving a copy.
One more option in the left menu of our user mailbox properties that we’ll look into within a couple of minutes is the “Mailbox delegation” menu. This option is a mini rights management where you can set “full access”, “send on behalf” and “send as” rights for a mailbox.
In our example, Oliver had a couple of aliases in his old mail setup.
Because we love our customer, we’ll gladly copy and paste these addresses in the new environment so he can be mailed on e.g. tha-bawz@shortstraw.be
Our third “straw” is John, who luckily doesn’t need extras so he’s good to go with an out-of-the-box setup, which starts him up automatically as john@shortstraw.be
We’re almost done with our basic mailflow configuration.
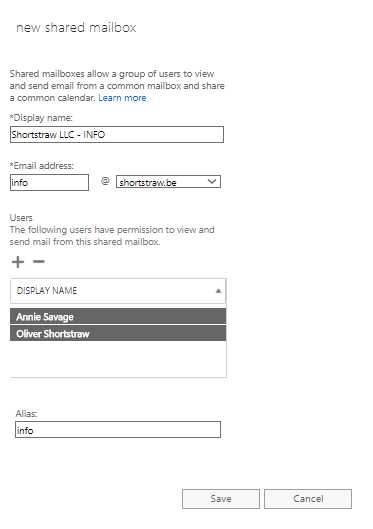
All that remains from our initial analysis (concerning the shortstraw.be domain name) is the remaining info@shortstraw.be that needed to be seen by both Annie and Oliver.
We’ve already established that a shared mailbox would be the most appropriate solution for this, so let’s configure one !
Go to the “shared” top menu and click the little + icon.
A familiar looking form appears.
You might recognize this from when you just recently created a new mailbox.
The biggest difference is the appearance of the permissions box.
Select the user(s) with permission to view and send from this box and press “Save”.
You’re good to go !
Setting up a shared mailbox is THAT easy.
You’ve got a basic mail configuration up and running.
If you’ve changed the DNS settings for the MX record as discussed in the previous migration post, you should be receiving mail by now.
If you’ve set up this mail config as a placeholder for when the actual migration starts, it’s time to move on to the migration now.
THAT’S RIGHT !! YOU GET TO ACTUALLY MIGRATE AFTER 5 CONSECUTIVE POSTS CLAIMING SO.
All jokes aside, in my humble opinion the prep work is incredibly important in deciding between keeping or losing your customer.
And that’s a decision from both the customer and the IT guy/girl !
Remember Oliver’s company (Shortstraw LLC) mail profile in one of our previous posts ? Refresh your memory if you stumble upon this website and have forgotten / not read the previous one.
I will base this actual setup on our findings in that post.
The hardware and operating system upgrading procedures, that I spoke about, will not be handled here.
Preparing the environment
Since we’ve established our to-do list, we can now start the procedure in which the customer will experience the least downtime.
Depending on the expectations of the customer, you can either perform all these actions on-the-fly or prepare yourself thoroughly. In this case we’ll take the long(er) road.
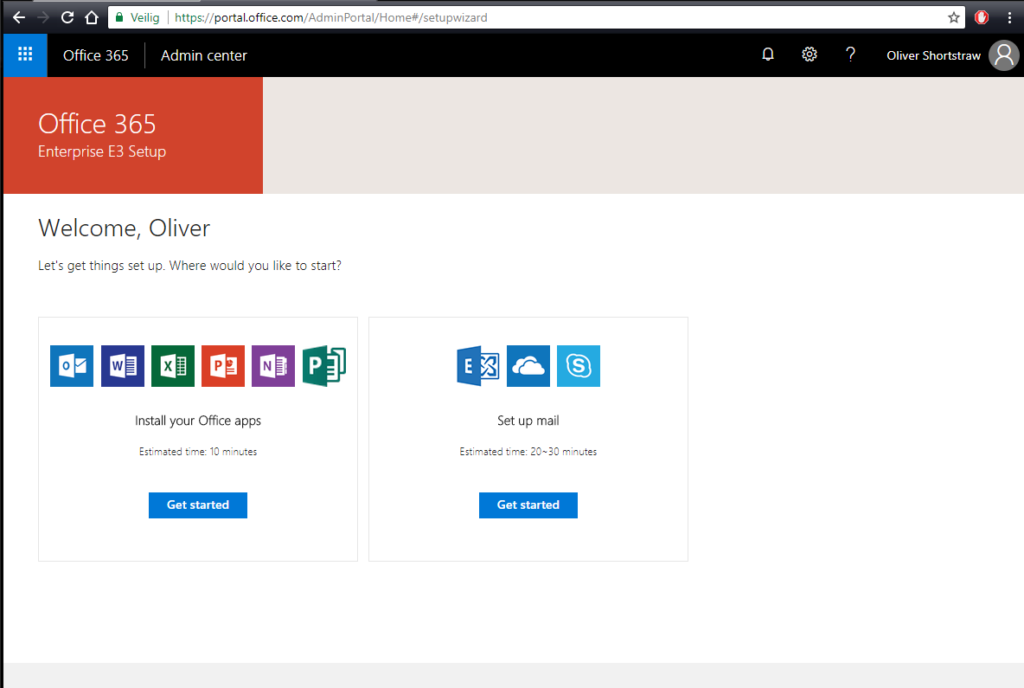
After having created the 30-day trial (or go ahead and buy one instantly through Microsoft or a Cloud Solutions Partner)
At least, we’re welcome
You’ll be greeted with something similar to the screenshot above.
Clicking the upper left square icon will get you into the apps menu.
Depending on the user rights and licenses, you’ll see less or more icons, representing the programs and apps you’re allowed to use.
One important icon you’ll see, is the “Admin“.
Users that have administrator rights will be provided with this option.
In this example, our admin user has a fully working E3 license (you get 25 of these buggers in an O365 trial), which is something that’s “not done” in a real life situation.
Were you to upgrade this 30 day trial to a full tenant, I strongly suggest stripping the admin account of all his licenses. It’s bad practice to use your O365 admin account for anything else than … well… admin purposes.
We’ll get into licensing later.
The admin menu
Click on “Admin” and a specific administrative portal opens.
You can take a short tour of everything by clicking “Start the tour” if you want or read onward and click “Skip”.
On the left side of the admin page you’ll notice the admin menu (which is deliberately placed as a screenshot on the right side of this page, just to confuse you)
First thing you’ll be wanting to do is to create the situation with the correct internal mailflow, user rights etc.
Remember : as long as you don’t change the MX record in the customer’s DNS settings, NOTHING will happen to the existing setup.
You can safely mess around until you’ve got the flow up and running to your own standards.
Remembering our previous conclusion, we’ll start creating our users’ mailboxes first.
If you want to get this right at first try, you’ll want to include the domain first as an “inbound” domain into your O365 tenant. This will allow you to create user names ending in @yourdomain.com instead of @yourdomain-com.onmicrosoft.com.
Again, including the domain name will not change your current mail flow.
DON’T PANIC !!!
Open the Setup menu and click “Domains”
One domain will be listed by default.
This is you tenant name (in my example “shortstraw.onmicrosoft.com”) and cannot be removed.
Click “Add Domain” and fill in the desired domain name, after which you click “Next”.
In order for Microsoft’s servers to verify your identity and double checking if you’re actually the owner or admin for your added domain, you’ll be given the choice of either adding a TXT record or adding a fake MX record into your own DNS management software at your hosting company’s admin package.
In my case, the lovely French hosting company “OVH” will be my location to turn to.
A line of TXT in OVH’s DNS management
Eventually, practically every DNS hosting company allows you to manage your settings through some form of admin portal for easy setup purposes.
Once the record has been added, you can click the “Verify” button to let Microsoft doucble check the creation of the record.
Troubleshooting :
If the TXT record is not yet found, according to the O365 domain verification wizard, you can always start your troubleshooting on a global level by surfing to https://dnschecker.org/DNS Checker creates a worldwide DNS lookup, using all sorts of DNS servers to see if your DNS record has propagated already to all locations.
Usually DNS propagation for a brand new domain record will probably not take a lot of time. It’s those record changes that tend to take longer.
Successful verification will get you to this screen
From this point on, you’ll be able to pick your domain name already in the user creation wizard.
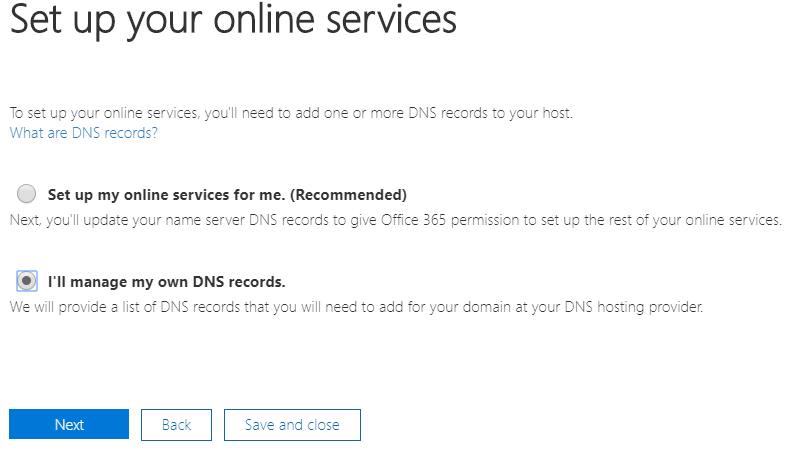
Should you choose to continue, more DNS records will be added.
Skip forward to user creation. (link not yet implemented, because too lazy)
The screenshot above will give you a sneaky Microsoft question, with the default option set to “Set up my online services for me”.
Though Microsoft might say “Recommended”, I strongly disagree here.
“Why’s that”, you say ?
In case you decide to stop your O365 adventures and want to move on to a new platform for mail, you’re going to have to go through a lot of hassle to set this straight again.
Always choose to manage your own DNS records and click “Next”. Unless you’re REALLY pissed about your current DNS provider. In that case, I still suggest just finding another one. BUT NOT MICROSOFT FOR THE LOVE OF GOD.
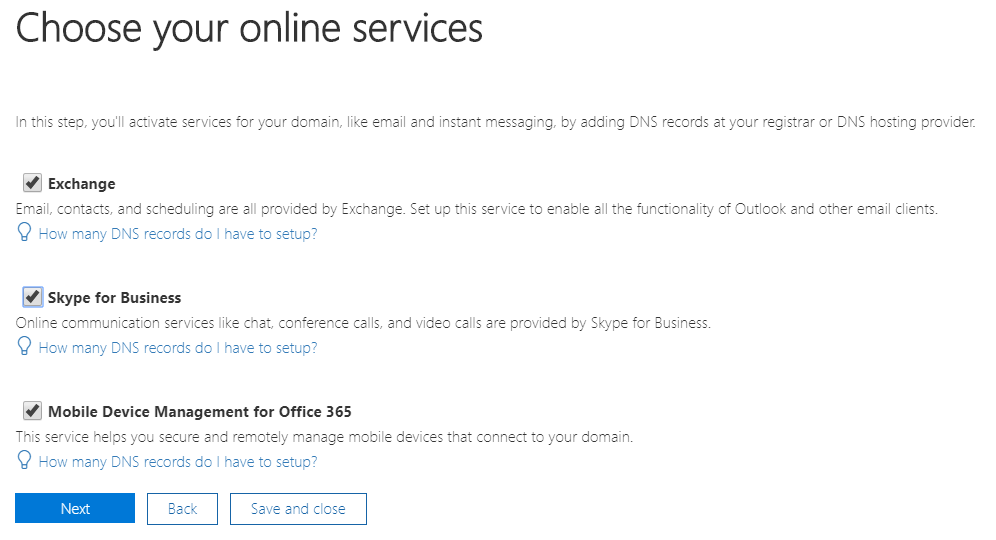
Choose what you need (or select all)
A step that has been neatly added in the onboarding wizard, since Q4 of 2017 is the “Choose your Online Services” wizard.
This narrows down the amount of DNS records for you to add, according to the active checkmarks.
I’m going to select all of them, because I know my end-customer Oliver Shortstraw will need toe Exchange parts as well as the Mobile Device Management.
He’s also a somebody that changes his mind in the blink of an eye, so just to be sure we won’t have to setup anything else later, I also picked “Skype for Business”.
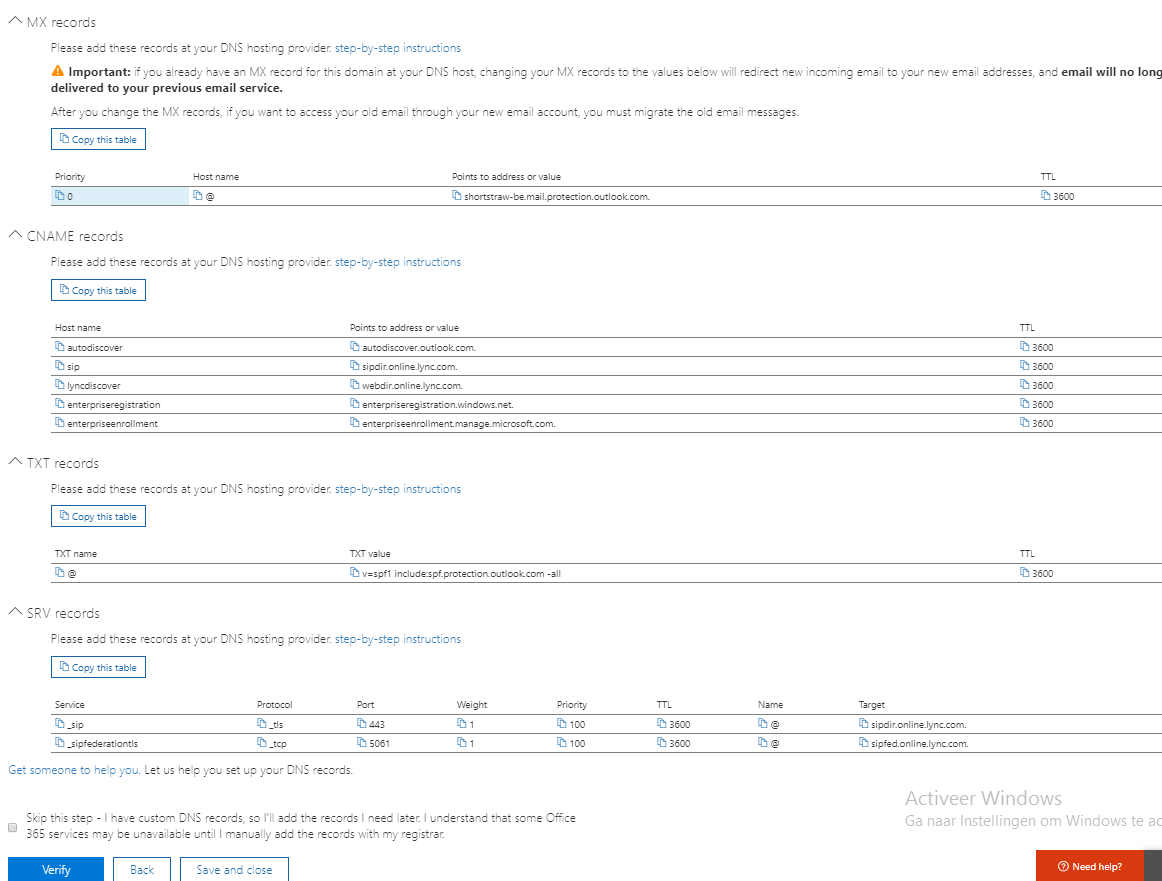
A somewhat huge list of DNS records will appear, for you to fill into your favorite DNS hoster *cough* OVH *cough*
A wild list appears. You crit it for 9000. It was super effective
Now in order to fully understand what’s going on here, I’ll explain in detail the actual stuff that’s going on. Teach a man to fish etc.
FINAL WARNING (I won’t repeat it again) DO NOT CHANGE THE MX RECORD JUST YET (unless this is a brand new setup for a brand new domain, then go ahead and have fun)
CNAME : autodiscover > autodiscover.outlook.com
This record basically tells your Outlook client to read a pre-made config file on a Microsoft server.
Thus allowing you to just enter your e-mail address and password in the Outlook setup wizard, instead of having to go through the hassle of manually setting up your O365 config.
CNAME : sip > sipdir.online.lync.com Refers to the actual SIP server for using Skype for Business/Lync/Teams. Your communication client will connect to this server and this server will in place patch you through to the geographically most redundant SIP server.
CNAME : lyncdiscover > webdir.online.lync.com
This server uses the same Autodiscover protocol as the Outlook one.
It patches you through to the correct Microsoft server cluster where your tenant is hosted, as well as other various kinky background processes. Dragons be here.
CNAME : enterpriseregistration > enterpriseregistration.windows.net
Basically serves as a registration server (duh), so the Microsoft servers know what mobile device was added to the tenant for so-called “conditional access”
CNAME : enterpriseenrollment > enterpriseenrollment.manage.microsoft.com
Enrolling (again, duh) Windows mobile devices and managing them through Microsoft Intune, requires these servers.
TXT : v=spf1 …
Specifies the server(s) that may send mail, originating from your domain name.
More on SPF records in an other post.
For now, follow the suggested entry, which – shortly explained – allows a group of servers that are defined in the name spf.protection.outlook.all to send mail from your domain. All others are denied.
SRV : _SIP
Together with the sipfederationtls entry, these are usually the more tricky ones to enter, depending on the DNS management tool. [An example from the one.com hosting panel].
This specific entry provides the security layer.
SRV : _SIPFEDERATIONTLS
This entry states the TCP port 5061 is being used for everything federation-related in communicating over SIP. A Classic SIP port uses port 5060. Microsoft likes to do things in their own special way…
MX : xxxx-yy.mail.protection.outlook.com
An automatically generated server name, based on your domain name and domain extension.
MX is short for Mail Exchanger and tells other mailservers in the world where to go dump its mail for your specific domain name.
The second you change this record in your DNS management (and it gets propagated world wide, bla bla) your mail will be directed to the server(s) in this record.
<lazy mode> Let’s assume for the time being, that our test company does not care much for just a little downtime and let’s change all these records in our DNS management tool </lazy mode>
Clicking the “Verify” button at the bottom of the wizard page will get Microsoft’s O365 server to check all your entries. Depending on the DNS management tool and the hosting company, this might take a couple of seconds up to a couple of hours.
After a successful verification of all entered services, let’s move on to creating new users in the next post.
For now, pat yourself on the back for a job well done and have a refreshing beverage.
Wanna mess around in a demo version of Office 365, before trying the real thing ?
No problemo !
Go to https://products.office.com/nl-be/try and create an account to your heart’s content.
One big /!\warning/!\ before actually doing so :
Experience has taught me that – while you can create a 30-day demo account and perform all the fun stuff that the full version can – there’s a couple of things you need to know about your demo version.
All domain names added to this O365 tenant, even if it’s in demo mode, have a tendency to remain there even after your trial has expired. In concreto, this signifies, you will not be able to add this domain to a new O365 tenant, should you want to do this, after ignoring the renewal of your demo.
Microsoft has this funny way of holding onto your old data if anything external is still linked to your account. In this case a domain name.
So, when you plan to stop your demo account, be sure to remove all external factors first (such as the link to your own domain name, linked mailboxes that are being pushed into an O365 mailbox, …)
If you don’t do this and you will need this to be re-linked afterwards, you might have to call Microsoft support. *sigh*
You’ll never be able to fully clean up all the messing around you performed in your demo version, so make sure you actually start a new and clean tenant if you want the start using O365 “for real”, thus no mistakes that you made are moved into your live setup (hey, I’m not judging, this is actually what demo environments are for).
If you want the full experience, I do suggest buying a domain name (or using one you have lying around) to integrate into your O365 demo environment, as this will teach you how to fiddle around in the DNS settings later on.
This will also allow you to log into your environment using your actual email address instead of some my_user_name@some_tenantname.onmicrosoft.com .
Mail functionality coming from a .onmicrosoft.com domain is usually blocked or filtered in many cases, so for good form, just integrate a domain name.
We’ll see how this is done later on.
Make sure you get a domain host that allows you to add SRV records, if possible. This will allow you to properly configure your Skype For Business / Lync / Teams communication setup.
A more simple explanation on SRV records can be found through this link.
Getting our hands dirty (almost)
In this example setup, we will be creating a basic startup scene through which we will continue to enlarge our virtual company, adding the necessary services as we need them.
For now, our company “Shortstraw LLC” has not seen the proverbial light yet and just wants his mail in the cloud and accessible at all times.
Shortstraw’s current mail setup for their Belgian branch consists of some simple POP boxes (or so they told us, their IT implementor *dramatic sound*)
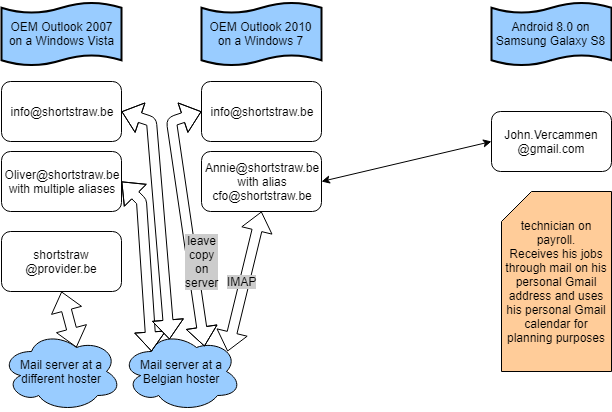
Shortstraw’s mail setup according to first contact with the customer
The image above (because a wall of text doesn’t read as easy as a children’s illustrated book) shows how the customer describes his current mail situation, after having established first contact over the phone.
Oliver (the CEO) and Annie (the CFO) each have a mailbox which they read in their not-yet-documented mail program.
Together they both read the info@shortstraw.be mailbox as a POP box, while leaving a copy of the messages on the server, which is an old-school way of sharing a mailbox.
Their technician, John, receives his to-do list from Annie onto his personal Gmail mailbox john.vercammen@gmail.com , so he can use his calendar on his smartphone.
Actually getting your hands dirty
For good form and for good measure you as the IT guy decide to visit the customer, because that’s what you do in cases like this. You go and check on what’s real instead of relying on end-user information. No offence to you dear end-user, who might also be reading this article. I’m just stating the obvious, which is also the reason you contact an IT guy in the first place instead of performing the move to O365 yourself.
After a small audit, you discover the situation to be as follows (example taken from real life) ⇒
Veritas !
You’ll notice already the subtle difference after you got your hands on the computer.
Seemingly unsignificant, there are a few things to be taken into account.
Windows Vista : the easiest one to notice AND resolve. Get rid of this product.
Don’t upgrade to Windows 10 as this is not supported. You can always try to do a fresh W10 install, should the hardware support this, but see this as a sales opportunity.
Office 2007 OEM : 2 things.
– you cannot reinstall (license-wise) an OEM license onto a new computer
– don’t apply Office 2007 for future use in an O365 environment. I’ve mentioned this before. You’ll get into tons of trouble, such as calendars and contacts not synchronizing.
Windows 7 : try to get this to at least Service Pack 1.
info@shortstraw.be : only a copy of the messages is being held onto Annie’s computer, which means… Oliver probably has the most chance of having a more complete inbox.
Every time Oliver checks the mails, Annie would no longer receive this mail if Oliver was the first to receive them.
oliver@shortstraw.be : make good note of all his aliases in the mailbox management system he’s currently using at his Belgian mail hosting company. Chances are he’s going to want to split this up into multiple boxes for overview purposes.
shortstraw@provider.be : an older POP mailbox that customers still use now and then. This mailbox is mainly kept for historical reasons, but Oliver wants to be able to at least read this mail in the future.
annie@shortstraw.be : has the cfo@ alias.
She has her Outlook configured to receive her personal mails through IMAP. According to herself, this was intentional so that she could read her mails on her cell phone as well. This was never configured, however, but the situation remains to this day.
Annie’s computer uses the local Outlook calendar to plan all things for the business, including keeping a double of the invites she sent to the technician.
John Vercammen : with the exception of having his LTE/4G data plan payed for by Shortstraw and receiving his Samsung Galaxy S8 for work, he is not linked into the company network as such.
Analysis
Having all the information above, even as a layman at O365, you can see that there is much room for improvement, such as getting rid of old techniques for sharing a mailbox, getting your employees in sync with your company, upgrading software etc.
For this case, which is a fine example of a typical situation, my suggestions, based upon my personal experience and Office 365 support are the following (all mailflow suggestions can also be done in different ways; I just hand out the most common ones) :
Partly related to Office 365, I’d suggest getting rid of Windows Vista AND the Office 2007.
I deliberately added the term ‘OEM’ in my example as OEM software cannot be transferred (in terms of license) to new hardware in case of Office and Windows.
Even were Oliver to buy a new computer and he’d want to re-use his Office 2007 – which would have been an silly choice due to compatibility issues – OEM licensed software can’t be transferred to new hardware.
In a related side-note : Office installations ‘bought’ through O365 can be installed on 5 computers for personal use.
Office 2010 on Annie’s computers needs to be upgraded to Service Pack 3.
Her operating system, Windows 7, needs at least Service Pack 1.
info@shortstraw.be : this needs to become a so-called shared mailbox. Shared boxes have the same value as an ‘ordinary’ mailbox, but without a physical user linked directly to it. Hence, no financial cost is attached to this box.
In the migration process, you’ll need to use Oliver’s computer for the most correct and up-to-date content of this mailbox, due to the nature of how ‘leave copy of messages on the server’ works in a POP3 environment (crf. Annie’s PC)
oliver@shortstraw.be / shortstraw@telenet.be : both boxes are POP mail. You can easily export these boxes through Outlook’s “Export to PST” function. Don’t forget to export all content of the mailbox, such as agenda and contacts
Speaking of contacts : a common mistake is confusing the autocomplete list in Outlook (that’s the list of addresses that appears when you start typing the first letters of an e-mail address) with an actual contact list.
Seeing as you’ll be creating either a new profile in Outlook or a clean install on a new computer, you’re going to want to back up this list somewhere. Microsoft has a handy how-to on how to accomplish this.
Should you want to dive a bit deeper in the markup of an NK2 file (which is the file extension for an autocomplete list up until Office 2013), I suggest downloading NK2Edit by Nirsoft (a website totally worth visiting for tons of handy tools, by the way)
annie@shortstraw.be : now this is an other story. IMAP mailboxes are to be handled with caution, due to their nature in which they are built.
If you were to simply export an IMAP mailbox to a PST file, for import purposes later on in O365, you might run into the fact that only the mail headers are stored in the PST file. The actual content isn’t.
Microsoft has yet another handy couple of ways of importing IMAP mailboxes. We’ll get to that when the actual process of importing starts.
It basically involves the Office 365 servers at Microsoft connecting to the IMAP server themselves, without you having do anything client-side.
You tell the servers in which mailbox to ‘dump’ the content of the remote IMAP mailbox and the process runs slowly in the background. You’ll have to ability to check on the status.
John Vercammen : don’t worry about John (yet). The implementation of integrating John in shortstraw.be is as easy as creating a new mailbox. There’s still a couple of options left open, such as integrating his personal gmail directly into his O365 and choosing the right subscription for John, depending on his specific needs (for instance if he wants to work from home on his personal computer and he’d need a Microsoft Office installed)
The IT guy guides, Oliver decides.
As a personal thought exercise I suggest you try to come up with a couple more improvements for this customer’s network, as I’ve left some subtle ones yet unhandled.
In the next post, we start the process of migrating, while explaining every step’s why and how.
If you’ve missed the previous post on O365, and/or haven’t got a clue what this product is, please read the previous blog post on this page. With that out of the way…
What do we understand under the concept of ‘migration’ ? Migrating to an O365 environment can start from something as simple as ‘moving away from your mail provider, that gives you a your_name@generic_provider_name.com address’ to ‘getting your entire company in the cloud, files, authentication and the whole shenanigans‘.
As an IT implementer for your customer, you’ll need to converse with the end-user to figure out his exact needs. As an end-user you’ll let to have your IT implementor allow to ask you tons of question and have him perform a thorough audit of your current situation. More on this a bit further in this post.
Both parties will get the most out of it, this way.
There’s nothing more frustrating (well maybe there is, but you catch my drift) than having bought a product after which you realise this wasn’t really the thing for you.
Resellers will lose credibility, end-users will be needlessly frustrated and in the longer run, Office 365 will get a bad name for the wrong reasons.
Yes, there are right reasons for not liking O365. There are many cases in which O365 is not the thing for you. Sound advice from an IT professional will help you (I’m looking at both parties) make the right choice.
For the purpose of this entire explanation, we will create a completely non-existing company, entirely not based upon true facts or totally not taken from a real-life situation (insert disclaimer here).
We’ll call it ContosoZupertails Inc.Shinra ShortStraw LLC.
Kudos to those that get the joke.
This company will be our example end-user, with its very own end-user needs.
Rolling start
pure nostalgia
Asking the correct questions will automatically get you a push in the right direction towards a succesful migration.
Don’t be bone idle and dare to ask questions. Standardisation is a wonderful thing for an IT provider, but leave some room for customisation.
You don’t want to end up being just a box-mover even though the box will be a virtual one in this case.
Eventually, you will create your own checklist, when having set up your own workflow for selling O365 as an IT partner. For now the following list of considerations is a fine way to start your audit.
Depending on the situation, some of these questions will be unnecesary.
I’ll also explain WHY you should ask these questions, as this is often a list that gets forwarded to either Microsoft or a CSP.
What is the current e-mail program (and is there room for change) ?An often unasked question that leads to unforseen timing issues in even the easiest of migration processes.
E-mail in Office 365 is shown to advantage in its native functionality : an Exchange server in the cloud.
Tons of functionality will be lost (calendar, contacts) when, for instance, using only IMAP or when trying to integrate your O365 in Microsoft Mail (default mail client in Windows 10) of Mozilla Thunderbird (mail client for cavemen or Linux users, not necessarily the same).Calculate extra time into your estimate, as an Outlook-to-Outlook migration is the easiest and fastest way to migrate.Also, if Outlook 2007 (or older… *shiver*) is still at play, you need to upgrade to at least version 2010 (with all necessary updates). Don’t listen to all those other websites that tell you that Outlook 2007 is compatible, because you’ll be in for some serious horror stories.
Preferrably upgrade to the newest version of Office, which is something easily achieved through O365, as some subscriptions come with a physical copy of Office.
Know the current mail setup inside-out (and dare to innovate and change)Ex(c)ellent advice
If change is considered a bad thing, maybe migrating to O365 isn’t your cup of tea.
The process of migration is often linked to fear, as well as by customer as by implementer.
That being said, it’s of the utmost importance to be aware of the current mailflow, amount of mailboxes, aliases, distribution groups, public and/or shared folders, …
Also check if there’s any device such as an all-in-one printer or a standalone device sending out mail from the domain name to be used in the O365 environment and make note of the model and make, so you can look up its compatibility.
Make note of every human entity, wanting to use your O365 setup within the environment of the end-user, because of the way the licensing system works.
It’s not 100% true, but as a rule of thumb, you pay per physical user.
With this knowledge, you can go and create a plan for the new mailbox setup, which doesn’t need to be a true one-to-one copy of its predecessor.
For instance, in O365, shared mailboxes, aliases and distribution lists are completely free, whereas some (older) mail providers might charge you a small fee for this. The same goes for a mail forwarder.
Don’t feel offended. For the purpose of being a completionist, here’s a short explanation of the mailboxes.
– a regular mailbox : at the time of this writing and depending on the subscription, you get either a 50GB or a 100GB limit mailbox with your O365 mail subscription. Full Exchange support (calendar, tasks, contacts, …) and webmail included.
Generally used as ‘user@domain.com’.-a shared mailbox : theoretically the same concept as the above. With the exception that no paid license is needed for this type of mailbox. You’ll need to configure user rights to the mailbox in order to allow others to access this, as a shared mailbox cannot be opened directly.
Hey, nothing’s really free, right ?
Usually, a shared mailbox is used as boxes in which multiple users can mess around. All changes made by user A will be seen by user B. In the past, this could only be achieved through IMAP.
Another classic reason to use a shared mailbox : user X leaves the company, but you want his mails to be archived and visible for a certain list of people. In this case you can convert a mailbox to a shared box after which your paid license for this box gets released and can be used for somebody else.
–an alias : essentially an extra label that allows a mailbox to be addressed through an extra email address. E.g. the original mailbox Oliver.Shortstraw@shortstraw.com could get an alias os@shortstraw.com or oliver@shortstraw.com in order to make the mailbox address more accessible.
– a distribution list : a list of mailboxes grouped together under one general mail address.
Sending to a distribution list will cause the mail to be received in all the members’ mailboxes.
If user A deletes the mail from his mailbox, user B will not know this.
The general consensus in using a distribution list, is that it’s mostly used for internal communication. O365 even allows turning on/off the option for this list to be available to the internet, so that you can use for example a technicians@shortstraw.com list to contact all your technicians in one mail.
– forwarding : not really a mailbox as it’s more of a feature you can activate on a mailbox (or even automate on a server-level. If set to a specific mailbox, a forwarder does nothing more than what its name already provides : it forwards mails to an other mail address (even outside your organisation)
Do you have access to DNS management for the domain which is to be integrated in O365 ?Migrating to O365 requires you to edit certain DNS records (more on this in a future post, where the actual process is explained). The time required to do this, is a crucial factor for a swift and painless migration.
When you’re in the situation where you don’t have access to some form of DNS management interface and you’ll have to be e-mailing an internet provider or a webdesigner to get this process done, you’re best to consider moving the DNS name to another host, for your own personal ease of work.
Sometimes, the DNS management is done by a webdesigner, as given as example above, because he or she created a website and held onto the domain management. In cases like this, it’s imperative to communicate beforehand with all parties included, in order to smoothen the entirety of the process as much as possible.
Does your IT Department have the expertise and time to complete the migration successfully?An often recurring question.
Seeing as the aspect of ‘time of implementation’ has been touched a couple of times already, it’s no surprise the ‘expertise and time’ question appears here.
For a succesful migration to work out, you’re going to need time.If you as a user will not plan your potential downtime, this WILL result in a large amount of unnecessary stress for your users and your IT implementor.
Office 365 training links in the portal
If you as an IT implementor do not plan your migration correctly, there WILL be downtime. A lot of it.
It’s imperative that you notify all users (see below) of potential changes in their mail and data environment. On a small scale, this can be handled quickly by having a simple chat or sending a mail a couple of days before the actual migration.
On a larger scale, this might involve training your users (and yourself).
The Office 365 admin portal has handy links for this purpose only.
Always have an IT partner ready as a backup in this case. And for good form, inform THEM as well on when you’re about to migrate 🙂
Have you discussed this with all your users ?The impact on time of availability of your users’ work environment is a factor not to be overlooked.
As a father of a partly authistic kid, I can assure you that some people do not handle sudden changes very well. Communication is key in all of this.
Even if it’s just informing your users of changes that are about to happen, the slightest status update is helpful in explaining why user X’s cell phone starts giving notifications and why user Y’s Outlook says ‘not connected’ in the taskbar.
Depending on the situation, you’re going to have to either give the users a small heads-up or you’re going to have to write manuals and configure tons of computers.
Yeay ! Job opportunities !
Do you have access to everything related to the internal network ?Often, you’ll need to move away from a local mail server or you’ll have to have access to users’ computers. Those users might not always have full rights on their computers to change settings.
Very few firewall settings might have to be changed, mailboxes might need to be accessed on a local server etc. etc.
These are just a few possible reasons for you to need access to the local resources on the user’s network.
A lot more questions remain to be asked, depending on the situation, but I guess you can already relate to this by now, after having read all the above. Let me just Google that for you, right here, in case you want more information on this topic and what questions you need to ask yourself before cloudifying your mail and data situation.
In my next post, we might actually get our hand dirty and start doing things.
Having to give daily support on this (I can say ‘amazing’) product, I’ve decided to write a couple of mini-guides on migrating you current mail environment to an Office 365 as well as related topics.
Some screenshots are taken from http://www.itpromentor.com/ , a website by Alex Fields, who is a great technical blogger, so I gladly link back to his site.
Seeing as teaching new techniques to human beings is always about helping people remember the ‘why’ in order to better understand the ‘how’, I’ll try to get into a bit more detail in every piece of the explanation and guides.
Before starting out, I’m going to give a tiny commercial heads-up on Office 365 products (no, I’m not sponsored by Microsoft in any kind).
If you’re a business user and you use Outlook ‘like a bawz‘, but hate all the fuss and the inability to easily interact with all your colleagues and customers, this is the thing for you.
O365, as I’ll be calling the product from now on (it types faster), starts low-cost at just ‘mail in the cloud’, but can go as far as cloud authentication and co-authoring documents, following up on workflows depending on the content of a file etc. etc.
I’m not going to play the devil’s advocate and give you a full lowdown on why you shouldn’t use Google For Business, as this product has its own amazing features as well. Heck, I even use it myself, for my own domain name. Aaaaannnd just to prove my point : co-authoring a document is still easier in Google Suite (which is the other/newer name for Google For Business).
The concept
If you’ve been living under a rock or you’re not into IT fashion words, I’d love to give you a small recap on the entire concept of O365.
Financially, there are two sides to this idea :
as a reseller, you’re guaranteed a small recurring fee per month/year for all your customers that you deliver onto the platform. Preferably using a Microsoft CSP to help you out. Do not expect to get rich overnight. O365 as a business model requires you to sell the product as your own, adding extra value to the product, which brings us to the second financial side…
as an end-user or business-owner, what stops you from taking out your credit card and just paying Microsoft directly the same amount you would probably pay your IT partner, were he to just sell you the product, is the extra value and direct support you can get from him.
I think we can all agree that in Microsoft’s eyes you are a small fry. Yes, even you, business-owner with 50 E3 accounts. This relates especially to the first-line support calls you will receive from a call-centre in Casablanca or Islamabad.
O365 requires less but still sufficient support as if you’d be running your own data- or Exchange-server. Keep this in mind when making the purchase.
– Will you install your own Active Directory from scratch ?
– Are you up to configuring your own send and receive connectors ?
– Do you have a plan in mind to perfectly set up your file structure in the cloud ?If all three questions can be answered with a ‘YES’, then hesitate no more and get your credit card out, surf https://portal.microsoftonline.com and figure it out yourself.
Google will be your friend in this journey.
The basic setup can be a bit overwhelming, but Microsoft has made managing your O365 environment relatively easy when you use only the web-interface.
Now that we’ve passed the money barrier, let’s talk practical specifics.
A general misconception (and I can totally understand the confusion here) is that O365 is a box you can buy in the local IT-minded supermarket.
It’s probably a misconception, BECAUSE THERE IS AN ACTUAL BOX YOU CAN BUY.
A wild bunch of Office 365 boxes in their natural state : unopened
We have to thank the lovely product managers at Microsoft for this confusing product naming here.
No, the actual products I’ll be talking about, are subscription-based products with names such as Business Premium (confused already ?), Exchange Plan 1, Office 365 E3, ProPlus etc.
The product name ‘Azure’ will be thrown around a lot too.
As a user, you’ll be paying Microsoft either directly or indirectly for a cloud-based solution that hosts your files, mail, calendar, without the hassle of maintaining your own physical server.
Other advantages include an always up-to-date version of Microsoft Office, an online collaboration platform (yes I’m talking about Sharepoint), a communication tool (Microsoft Teams, which used to be Lync/Skype for Business) and tons more.
The aforementioned Azure will also net you a true cloud server, if you’re in the running for something more than the default solution. As short-sighted as this very brief summary of Azure is, this post doesn’t really shed much light on Microsoft Azure.
Let’s say that calling it a ‘cloud server’ is an insult 🙂
DON’T PANIC
If you’re still reading this and haven’t run away in total disgust of either having to resell or having to use a Microsoft cloud product please keep an eye open for the next post on Office 365.
Also, that other fashion word, ‘Powershell’ : you’ll be hearing it a lot in advanced trainings.
Embrace it, don’t fear it.
If what you read in the above lines gives you the same feeling as watching a TV test signal, also don’t worry too much. Powershell is just a way of typing commands, just like good old DOS.
Plus you don’t HAVE to use it. It just helps with advanced management tasks.
There’s tons of online help available. Microsoft also allows you to play around in a 30-day trial environment.

 Once inside the Exchange Control Panel, select ‘Public Folders’ in the leftmost menu or on the dashboard.
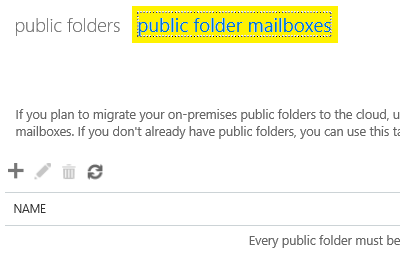
 Click the little “Plus” icon and fill out the necessary info.
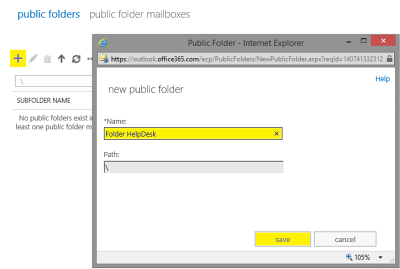 Click the little “Plus” icon in order to start creating your first Public Folder and name it as such.
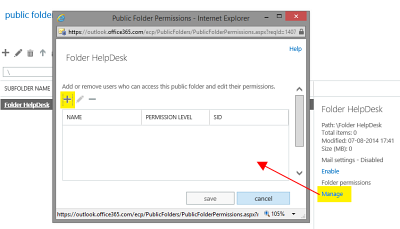 If you’re reading this as the IT guy/girl for a small company, you’re probably screwed and get to do this task yourself.
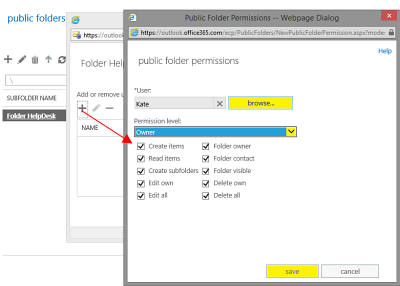 You can choose who you want to allow specific rights to this folder, by clicking the necessary rights ticks or selecting prefab permission levels in the dropdown menu.
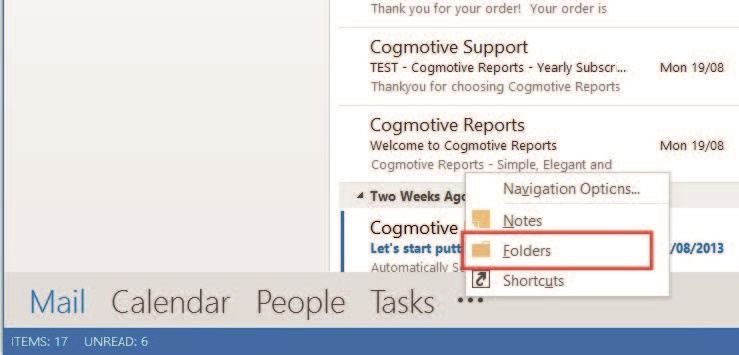

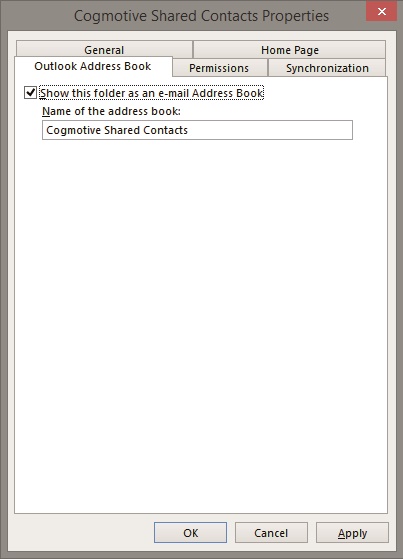 …where you can tick the option “Show this folder as an e-mail address book”, so that Outlook (and you mobile as well as webmail) will be able to display this list for you to search through.
 You didn’t think I was going to let you start a migration process without making you read the detailed “how and why”, did you ?
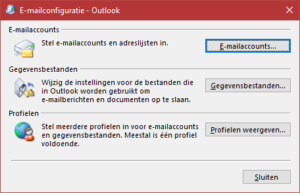 Windows users : Open Control Panel, go to Mail (32 bits or no reference to the number of bits, depending on the version).
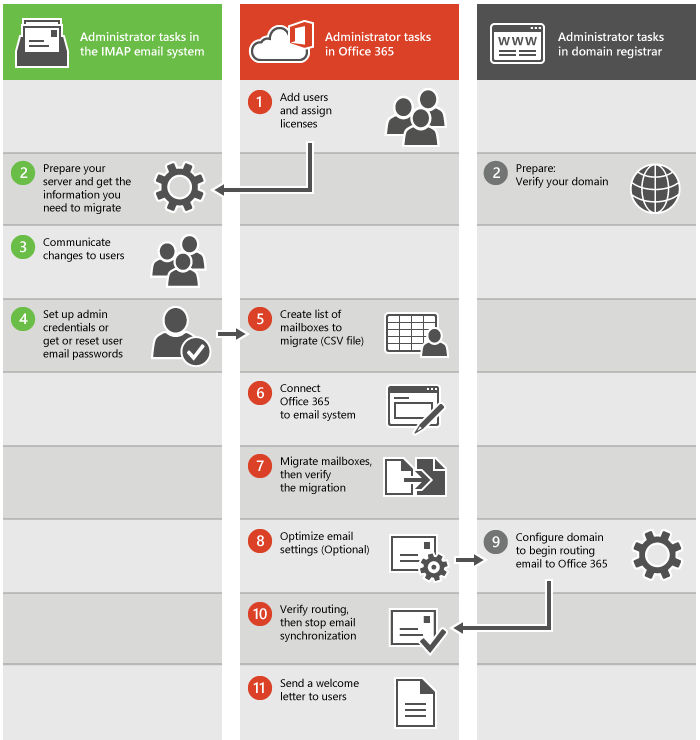
 The Exchange Admin Center is actually the way to go when you want to configure your mail environment in more detail.
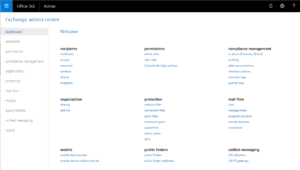
 In our example, Oliver had a couple of aliases in his old mail setup.
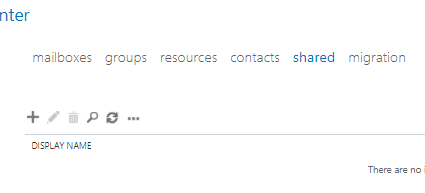

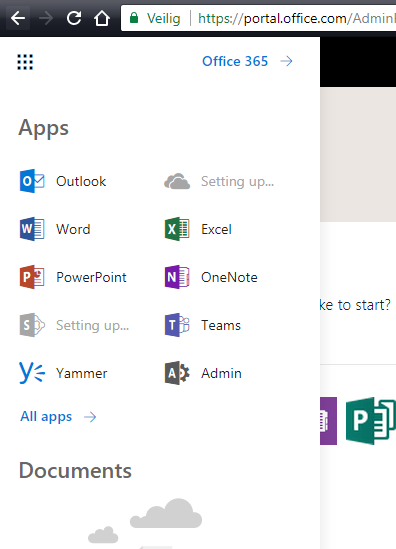 One important icon you’ll see, is the “Admin“.
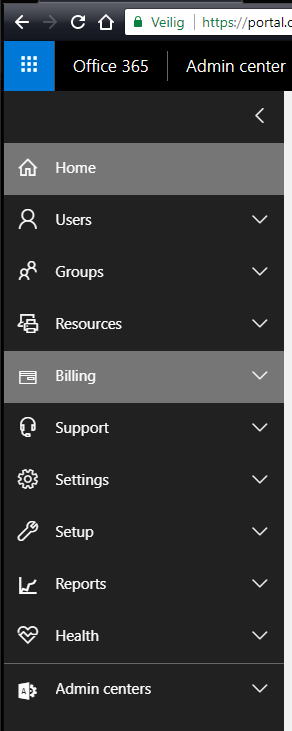
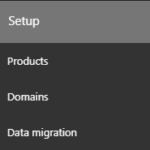 Open the Setup menu and click “Domains”
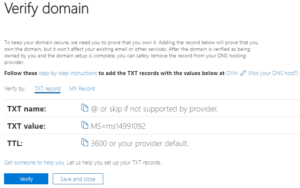

 One big
  In this example setup, we will be creating a basic startup scene through which we will continue to enlarge our virtual company, adding the necessary services as we need them.
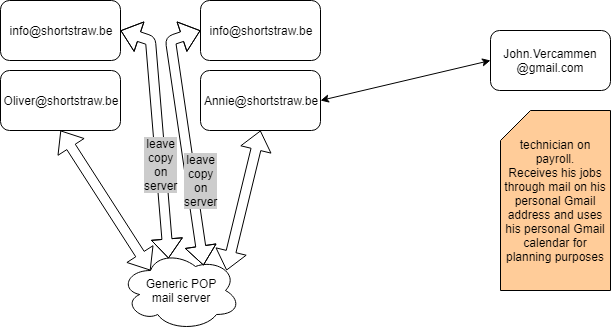


 Migrating to O365 requires you to edit certain DNS records (more on this in a future post, where the actual process is explained). The time required to do this, is a crucial factor for a swift and painless migration.
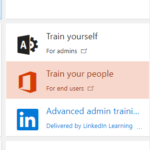

 If you’ve been living under a rock or you’re not into IT fashion words, I’d love to give you a small recap on the entire concept of O365.
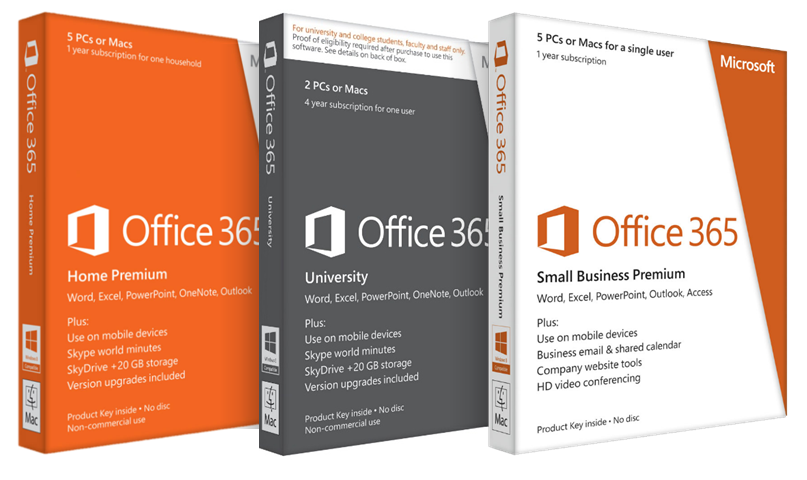
 If you’re still reading this and haven’t run away in total disgust of either having to resell or having to use a Microsoft cloud product please keep an eye open for the next post on Office 365.