
Remember Oliver’s company (Shortstraw LLC) mail profile in one of our previous posts ?
Refresh your memory if you stumble upon this website and have forgotten / not read the previous one.
I will base this actual setup on our findings in that post.
The hardware and operating system upgrading procedures, that I spoke about, will not be handled here.
Preparing the environment
Since we’ve established our to-do list, we can now start the procedure in which the customer will experience the least downtime.
Depending on the expectations of the customer, you can either perform all these actions on-the-fly or prepare yourself thoroughly. In this case we’ll take the long(er) road.
After having created the 30-day trial (or go ahead and buy one instantly through Microsoft or a Cloud Solutions Partner)
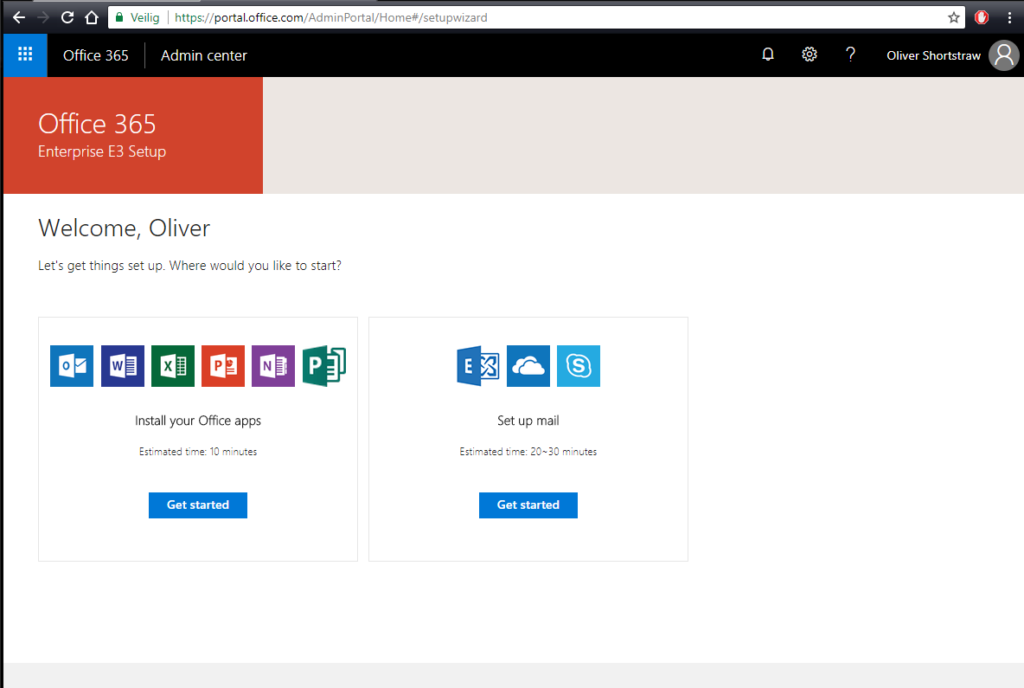
You’ll be greeted with something similar to the screenshot above.
Clicking the upper left square icon will get you into the apps menu.
Depending on the user rights and licenses, you’ll see less or more icons, representing the programs and apps you’re allowed to use.
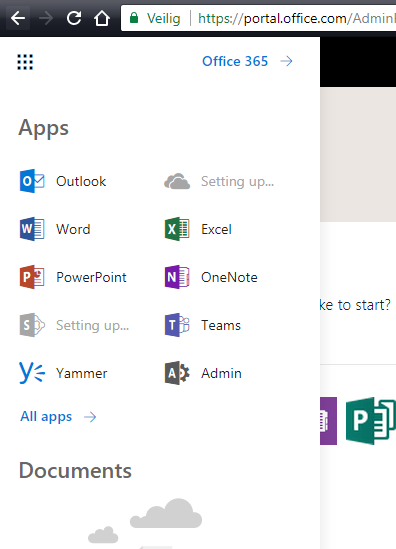 One important icon you’ll see, is the “Admin“.
Users that have administrator rights will be provided with this option.
In this example, our admin user has a fully working E3 license (you get 25 of these buggers in an O365 trial), which is something that’s “not done” in a real life situation.
Were you to upgrade this 30 day trial to a full tenant, I strongly suggest stripping the admin account of all his licenses. It’s bad practice to use your O365 admin account for anything else than … well… admin purposes.
We’ll get into licensing later.
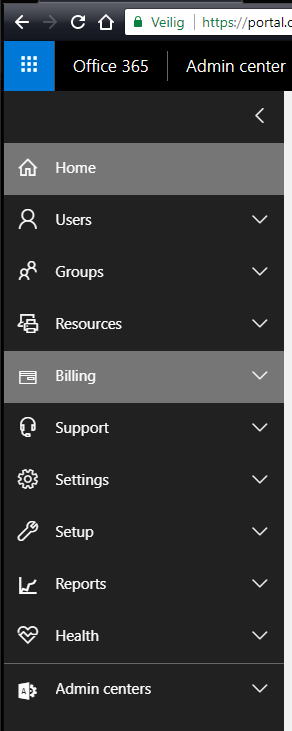
Click on “Admin” and a specific administrative portal opens.
You can take a short tour of everything by clicking “Start the tour” if you want or read onward and click “Skip”.
On the left side of the admin page you’ll notice the admin menu (which is deliberately placed as a screenshot on the right side of this page, just to confuse you)
First thing you’ll be wanting to do is to create the situation with the correct internal mailflow, user rights etc.
Remember : as long as you don’t change the MX record in the customer’s DNS settings, NOTHING will happen to the existing setup.
You can safely mess around until you’ve got the flow up and running to your own standards.
Remembering our previous conclusion, we’ll start creating our users’ mailboxes first.
If you want to get this right at first try, you’ll want to include the domain first as an “inbound” domain into your O365 tenant. This will allow you to create user names ending in @yourdomain.com instead of @yourdomain-com.onmicrosoft.com.
Again, including the domain name will not change your current mail flow.
DON’T PANIC !!!
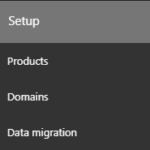 Open the Setup menu and click “Domains”
One domain will be listed by default.
This is you tenant name (in my example “shortstraw.onmicrosoft.com”) and cannot be removed.
Click “Add Domain” and fill in the desired domain name, after which you click “Next”.
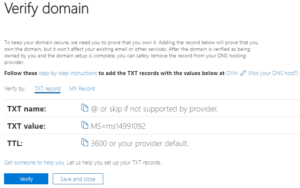
In order for Microsoft’s servers to verify your identity and double checking if you’re actually the owner or admin for your added domain, you’ll be given the choice of either adding a TXT record or adding a fake MX record into your own DNS management software at your hosting company’s admin package.
In my case, the lovely French hosting company “OVH” will be my location to turn to.

Eventually, practically every DNS hosting company allows you to manage your settings through some form of admin portal for easy setup purposes.
Once the record has been added, you can click the “Verify” button to let Microsoft doucble check the creation of the record.
If the TXT record is not yet found, according to the O365 domain verification wizard, you can always start your troubleshooting on a global level by surfing to https://dnschecker.org/DNS Checker creates a worldwide DNS lookup, using all sorts of DNS servers to see if your DNS record has propagated already to all locations.
Usually DNS propagation for a brand new domain record will probably not take a lot of time. It’s those record changes that tend to take longer.
From this point on, you’ll be able to pick your domain name already in the user creation wizard.
Should you choose to continue, more DNS records will be added.
Skip forward to user creation. (link not yet implemented, because too lazy)
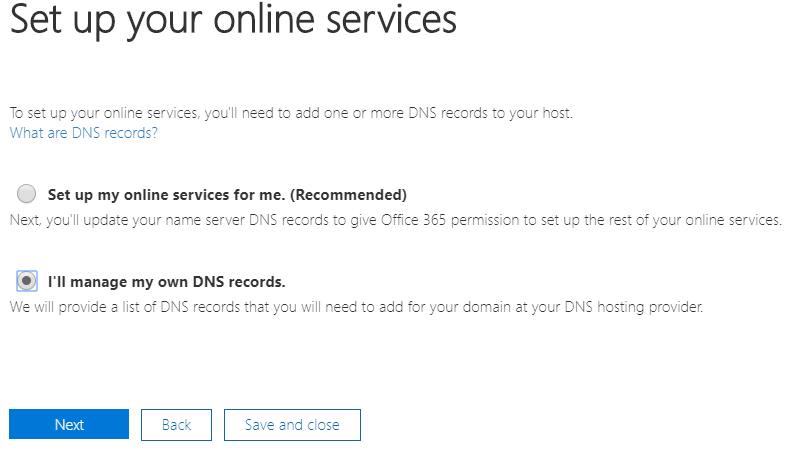
The screenshot above will give you a sneaky Microsoft question, with the default option set to “Set up my online services for me”.
Though Microsoft might say “Recommended”, I strongly disagree here.
“Why’s that”, you say ?
In case you decide to stop your O365 adventures and want to move on to a new platform for mail, you’re going to have to go through a lot of hassle to set this straight again.
Always choose to manage your own DNS records and click “Next”. Unless you’re REALLY pissed about your current DNS provider. In that case, I still suggest just finding another one. BUT NOT MICROSOFT FOR THE LOVE OF GOD.
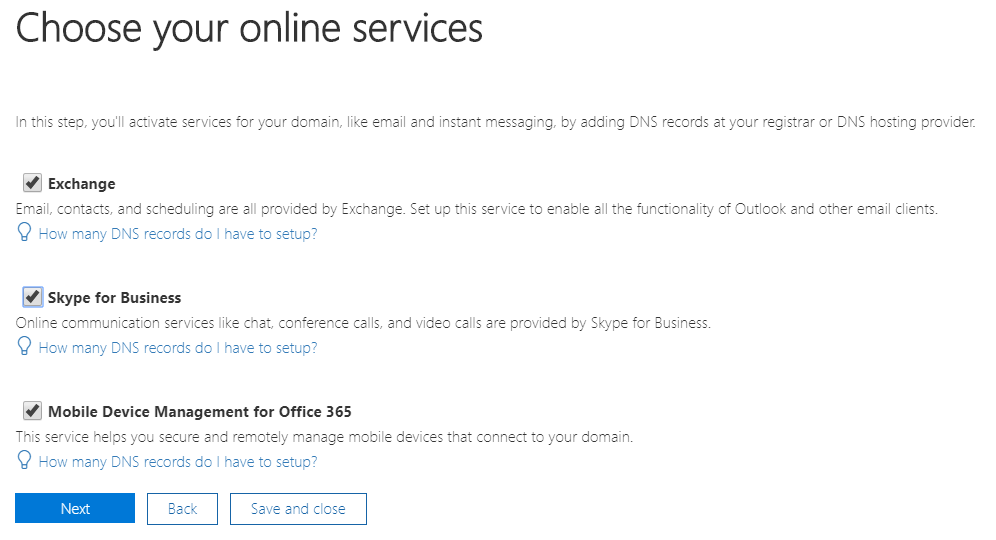
A step that has been neatly added in the onboarding wizard, since Q4 of 2017 is the “Choose your Online Services” wizard.
This narrows down the amount of DNS records for you to add, according to the active checkmarks.
I’m going to select all of them, because I know my end-customer Oliver Shortstraw will need toe Exchange parts as well as the Mobile Device Management.
He’s also a somebody that changes his mind in the blink of an eye, so just to be sure we won’t have to setup anything else later, I also picked “Skype for Business”.
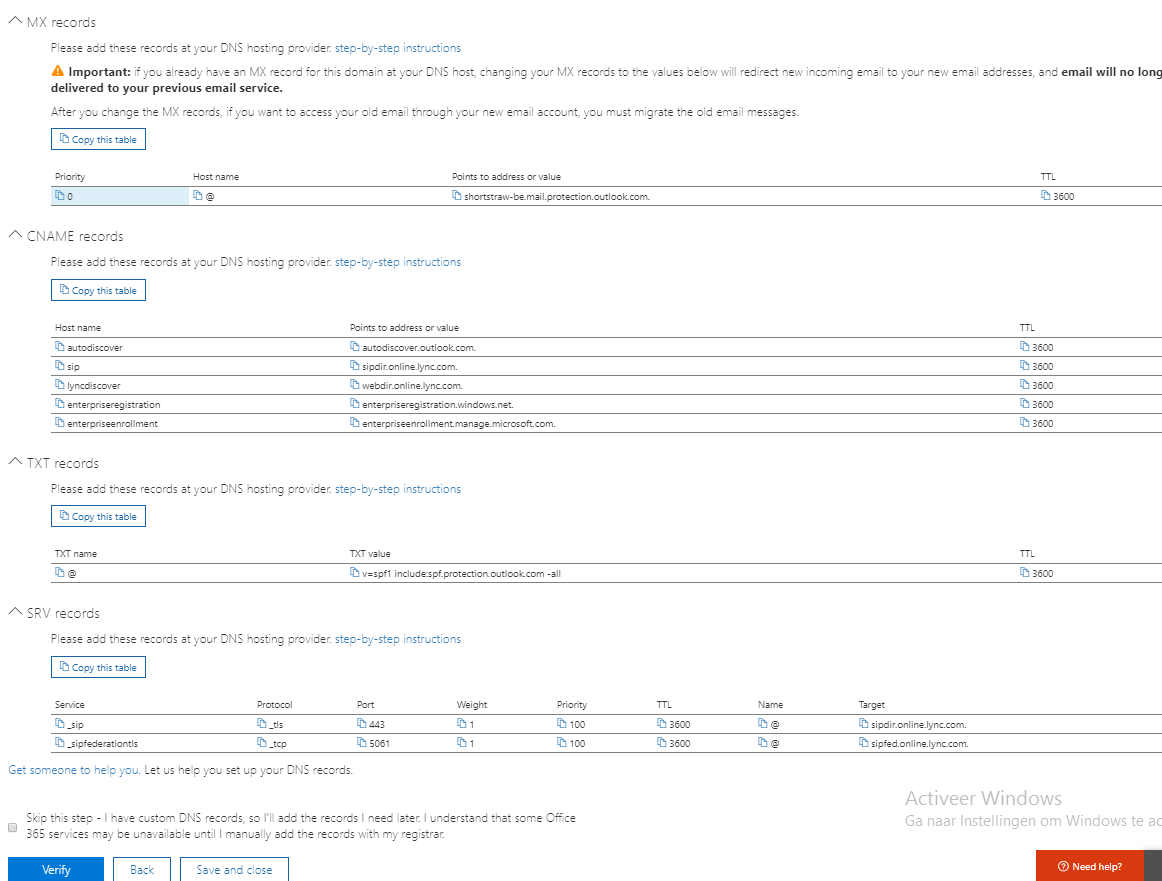
A somewhat huge list of DNS records will appear, for you to fill into your favorite DNS hoster *cough* OVH *cough*
Now in order to fully understand what’s going on here, I’ll explain in detail the actual stuff that’s going on. Teach a man to fish etc.
FINAL WARNING (I won’t repeat it again) DO NOT CHANGE THE MX RECORD JUST YET (unless this is a brand new setup for a brand new domain, then go ahead and have fun)
CNAME : autodiscover > autodiscover.outlook.com
This record basically tells your Outlook client to read a pre-made config file on a Microsoft server.
Thus allowing you to just enter your e-mail address and password in the Outlook setup wizard, instead of having to go through the hassle of manually setting up your O365 config.
CNAME : sip > sipdir.online.lync.com
Refers to the actual SIP server for using Skype for Business/Lync/Teams. Your communication client will connect to this server and this server will in place patch you through to the geographically most redundant SIP server.
CNAME : lyncdiscover > webdir.online.lync.com
This server uses the same Autodiscover protocol as the Outlook one.
It patches you through to the correct Microsoft server cluster where your tenant is hosted, as well as other various kinky background processes. Dragons be here.
CNAME : enterpriseregistration > enterpriseregistration.windows.net
Basically serves as a registration server (duh), so the Microsoft servers know what mobile device was added to the tenant for so-called “conditional access”
CNAME : enterpriseenrollment > enterpriseenrollment.manage.microsoft.com
Enrolling (again, duh) Windows mobile devices and managing them through Microsoft Intune, requires these servers.
TXT : v=spf1 …
Specifies the server(s) that may send mail, originating from your domain name.
More on SPF records in an other post.
For now, follow the suggested entry, which – shortly explained – allows a group of servers that are defined in the name spf.protection.outlook.all to send mail from your domain. All others are denied.
SRV : _SIP
Together with the sipfederationtls entry, these are usually the more tricky ones to enter, depending on the DNS management tool.
[An example from the one.com hosting panel].
This specific entry provides the security layer.
SRV : _SIPFEDERATIONTLS
This entry states the TCP port 5061 is being used for everything federation-related in communicating over SIP. A Classic SIP port uses port 5060. Microsoft likes to do things in their own special way…
MX : xxxx-yy.mail.protection.outlook.com
An automatically generated server name, based on your domain name and domain extension.
MX is short for Mail Exchanger and tells other mailservers in the world where to go dump its mail for your specific domain name.
The second you change this record in your DNS management (and it gets propagated world wide, bla bla) your mail will be directed to the server(s) in this record.
<lazy mode> Let’s assume for the time being, that our test company does not care much for just a little downtime and let’s change all these records in our DNS management tool </lazy mode>
Clicking the “Verify” button at the bottom of the wizard page will get Microsoft’s O365 server to check all your entries. Depending on the DNS management tool and the hosting company, this might take a couple of seconds up to a couple of hours.
After a successful verification of all entered services, let’s move on to creating new users in the next post.
For now, pat yourself on the back for a job well done and have a refreshing beverage.