
Whoever holds the gold makes the rules
Late 2023, Google and Yahoo announced new guidelines for sending e-mails to their networks.
Yes, you read it : “to“, not “from“.
If you’re an e-mail user and recently got a notification that your mail was refused by Gmail, read on and find out what the reasons could be and how you – as an admin – can resolve these issues.

Regular mail versus bulk mail
“The big boys'” requirements differentiate between regular (coming from you or me) mail usage and bulk senders, such as mass mailer for commercial purposes.
Having read the guidelines, I can narrow them down to the following…

Let’s start out with the requirements that are applicable to all senders :
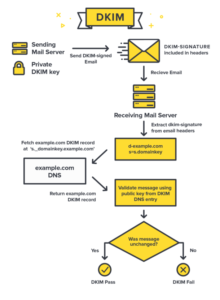
- Make sure that domain spoofing is practically impossible by implementing SPF in a strict way (use the “-all” flag) and sign your mails with a DKIM key, where possible.
- Make sure that recipients do not flag your messages as SPAM, either manually or automatically.
Now, this sounds like quite a general guideline… Google stuck a number to this statement and will start flagging you as a “spammer” if more than 3 out of your 1000 (0,3 %) mails to their systems get marked as SPAM.
That 0,3% doesn’t sound like a lot.
And it isn’t.
That’s why you as an IT implementer should make sure that your customer is not at any time sending out unsollicited mail. Ever.
Activation of MFA, using a separate mailing software for addressing your customers en masse and securing the customer’s domain are a NECESSITY. Protecting mail flow is no longer a matter of just username and password.

Bulk senders need to tighten the situation a bit more.
Now, before we list what the requirements for bulk senders are, I have to make clear that being defined as a “bulk sender” is a very “grey zone” kind of moment.
In official terms of Google, they define a “bulk sender” as an entity that sends 5000+ messages/day.
We’ve seen this number being interpreted by Google themselves as a much lower number in a few cases.
Basically it’s advised, to apply the requirements below for ALL your clients, as it’s best practice to tighten security as much as possible in every case.
The grey zone interpretation style of Google’s own rules also suggests this in between the lines.
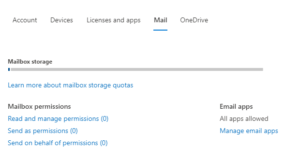
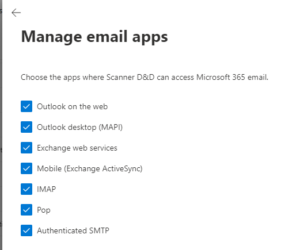
- Obligatory SPF and DKIM as stated above. If you’re using M365 as mail solution, there’s no reason not to set this up. It doesn’t cost anything extra and it’s a small effort that can count as a quick-fix.
- DMARC policy needs to be active.
A simple “p=none” policy is ABSOLUTELY NO LONGER a good thing.
This post explains the reasons why you should in fact do something with those reports: https://www.nospamproxy.de/en/dmarc-policy-why-p-equals-none-is-a-bad-choice/ - You’ve set up a DMARC record. Excellent!
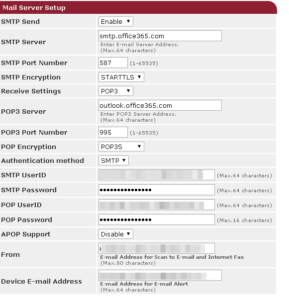
Now actually make sure all your mail-sending clients (Outlook, CRM tools, printers, …) are conform with all the measures you’ve put in place.
Have a cloud-hosted CRM packet that sends over your domain name? Have it use either a M365 connector or add it’s fixed IP to the SPF record.
If it has DKIM support, use it. Always. - The number one bad guy in mass mailers that ‘ll get your domain flagged as “bad reputation” is not having a one-click unsubscribe button/link in mails that you receive after subscribing to them. (RFC 8058)
A “List-Unsubscribe” header needs to be present in the mail headers , as well as a visible unsubscribe link in the message body.
This link must not lead to a complex unsubscibe procedure with multiple questions, but must literally be “1 click”.
Another self-proclaimed Google/Yahoo standard in these grey zone rules, implies that the unsubscribe must be done within 2 days after request.
Some extra Pointers and tools
- Make sure your “From” address and the from-header are the same. Especially the domain name in the address is the more important factor here. The term this applies to is called “domain impersonation“
- Where possible (not in a M365 case), try to add a valid reverse PTR DNS record that corresponds to your outgoing mail server name.
In most cases, you have to address your internet provider in order for them to add a reverse PTR record as this applies to the fixed IP addresses given out by them.
Reverse PTR records only make sense in cases where you actually send mail from a fixed IP.
As an example : I have mail server running that announces “mail.zupertails.be” as DNS name in my headers, while having a fixed IP at the office, where the server resides.
My ISP needs to add mail.zupertails.be as a reverse PTR record, linked to my fixed IP.
I’ll spare you the tech details, but trust me on this 😉 - Actually read the RUA and RUF reports that you set up in your DMARC record.
They can help you understand (even when it’s already too late and your domain has been flagged as “bad”) how your mails end up in spam.
https://mxtoolbox.com/DmarcReportAnalyzer.aspx can help you greatly in understanding these otherwise unreadable reports. - There’s no quick-fix solution when your domain is flagged as “bad” or “spam”.
Domain reputation is partially an organic thing.
Every email receiving provider handles the timeout period in its own way and has no concrete documentation for outsiders available on the details as how long your domain is flagged on their side.
You can get extra information on the health of your domain and what’s causing it to suck on https://dnschecker.org/domain-health-checker.php - ARC headers are yet another way of verifying the legitimacy of your mail flow.
https://www.validity.com/blog/how-to-explain-authenticated-received-chain-arc-in-plain-english/
Not every sender or receiver for that matter checks on ARC headers or allows the implementation of it.
If the link above is too much to read : ARC allows you to add a list of hosts, that allow the rewriting of mail headers, for instance in cases of mass mailing.
M365 supports ARC. - Stating the obvious : always send your mails in RFC 5321 and RFC 5322 format, that have their origins in 2008

Very funky and interesting tools that will help you on your way of becoming the ultimate mail flow troubleshooter :
- Gmail’s Postmaster tools : https://gmail.com/postmaster/
- MxToolbox has way more tools available than the one in their main menu : https://mxtoolbox.com/NetworkTools.aspx
- Check your domain health. Often. https://dnschecker.org/domain-health-checker.php
Zuper out


 Plan
Plan  Remember our
  More prep !

 Introducing “Sharepoint” is always a tricky one.
 I’ll also gladly push away some common misconceptions surrounding Sharepoint and its use, since potential users will start Googling and will eventually find articles that scare them away from this online platform.
 First of all, keep in mind that Sharepoint is a collaboration platform. The essential part here is that one word : “collaboration“.
 In Sharepoint everything is divided into lists and libraries. Remember my database reference above ? Well, a list or library is nothing more than a database table.
 Should you go over the limit of 5000, the automatic indexing process simply becomes not-so-automatic and will take around 24 hours, depending on the process timing by Microsoft, which is something you yourself cannot change.