Your customer’s CEO has seen the proverbial light and instead of being the M365 lemming that everybody else is, he’s heard of Calendly; a nice app that allows meeting requests to be made under your M365 tenant in a way more covenient way than the default Microsoft Bookings can do.
So being the good customer that he is, he just clicks on the “log in with your M365 credentials” button and clicks next-next-next, granting this app access to calendars and whatnot.
… were it not that (luckily) your M365 environment blocks this behaviour by default for non-admin users, so (if you did your homework, as an IT implementor), your customer’s CEO does not have an admin role on his production account.
The quick-and-dirty solution would be to grant the user temporary rights to install the app, after which you take away his rights.
Any update on the app would require you to do the same.
Wouldn’t it be nice…
As the Beach Boys already suggested in 1966, it would be nice … to handle this whole situation in a more structured way, because nothing screams chaos more than this sort of procedures.
An ideal situation would be that your customer automatically created a support ticket in your organisation’s helpdesk software, whereas he requests access to this app be granted to him.
After you verify if this app is trustworthy.
Well… that’s possible.
The feature is called “Admin consent workflow” and I’ll show you how to quickly configure this, so your support team gets a hassle-free notification.
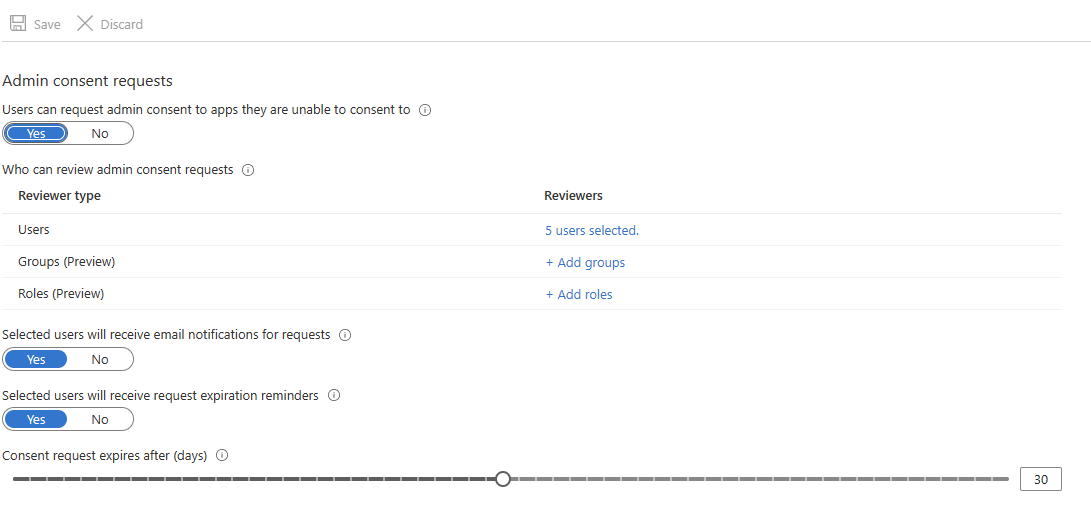
First of all, turn on the feature in the following menu :
Entra.MIcrosoft.com > (the entra admin center, where you log in as admin)
Enterprise Apps >
Consent and Permission >
Admin consent settings.
Self-explanatory screenshot of admin consent
This will allow you to pick users (or specific groups or even roles) to be notified, by mail, that user X wants to install company app Y .
Seeing as most helpdesk systems support mail-to-ticket , that already solves your ticketing system automation, by adding that support mailbox to the notifications, allowing you to receive this request in your ticketing system. ✅
The next and most logical step is to do something with this notification as a support engineer/admin.
Easy enough:
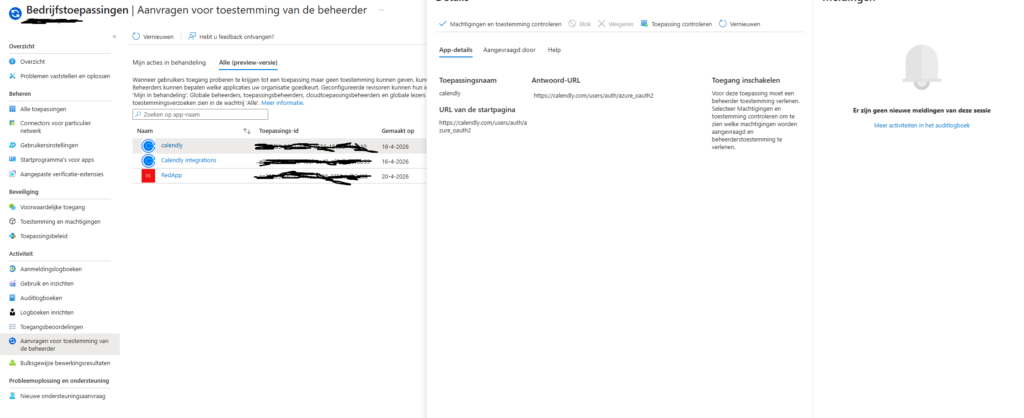
Admin consents overview
Open that very same entra adminpage and go to …
Enterprise Apps >
Activity >
Admin Consent Requests (or “Aanvragen voor toestemming van de beheerder” as it is so beautifully stated in the Dutch version)
The screenshot above shows you the approval list under “My pending” , where you can either Approve, Deny or Block the request.
The following Microsoft article explains in more detail what the 3 actions have as consequence : https://learn.microsoft.com/en-us/entra/identity/enterprise-apps/review-admin-consent-requests
…but judging by the names of the three options, I guess you can already tell.
Don’t Hassle the Hoff
In a small environment of 5 users, this procedure is to be handled perfectly easy.
In a 300+ users environment, this becomes quite a hassle.
There’s somewhat of an inbetween automated solution to making your admin life easier.
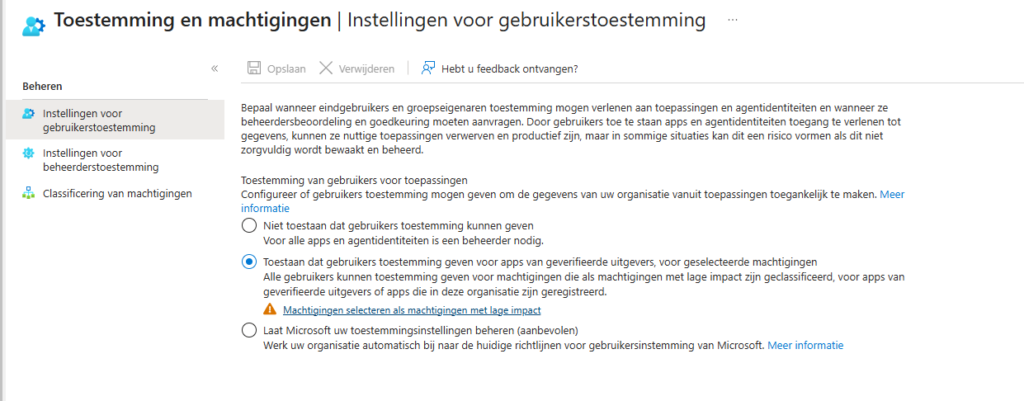
“User consent settings”, to be found on… Entra.MIcrosoft.com > (the entra admin center, where you log in as admin)
Enterprise Apps >
Consent and Permission >
And yes, again with the Dutch :p
This inbetween option allows you to choose the “sweet spot” for your admins, where you get to decide – based on a classification system – what apps are allowed by default.
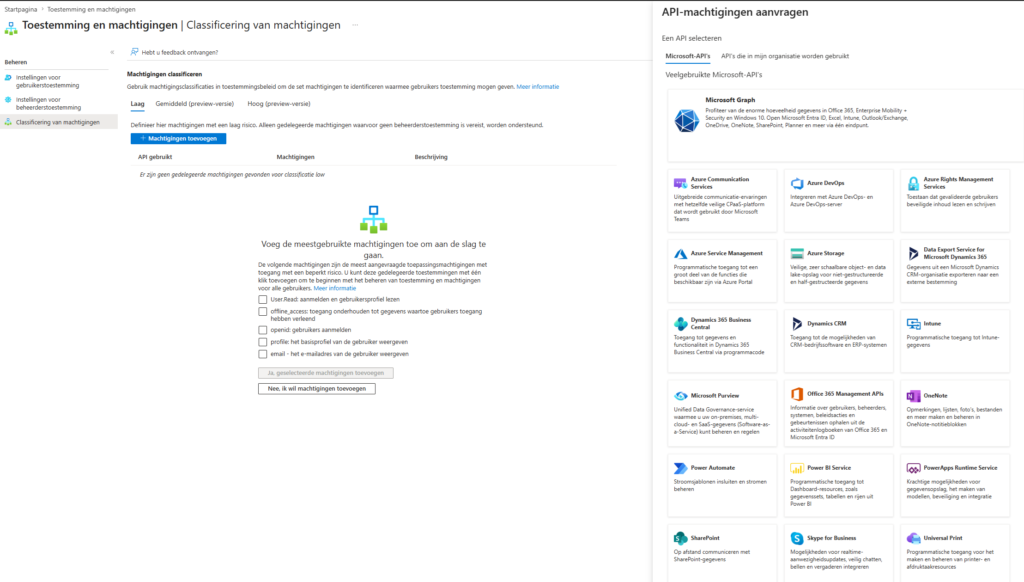
Clicking that link under “allow user to …” or clicking on “classifications…”
… you can decide either default rights to be allowed (such as user:read) for any app or pick a trusted API from the list, so next time a user wants access to that specific API or picks an app with very limited rights, they can go all out.
I’m gonna leave you with figurig out how to define Low, Medium and High classifications yourself, but seeing as you made it to the end of this article without falling asleep, I’m confident you got this !
See any mistakes in this article or have suggestions ?
You know how to contactme !
Late 2023, Google and Yahoo announced new guidelines for sending e-mails to their networks.
Yes, you read it : “to“, not “from“.
If you’re an e-mail user and recently got a notification that your mail was refused by Gmail, read on and find out what the reasons could be and how you – as an admin – can resolve these issues.
Regular mail versus bulk mail
“The big boys'” requirements differentiate between regular (coming from you or me) mail usage and bulk senders, such as mass mailer for commercial purposes.
Having read the guidelines, I can narrow them down to the following…
spam, bacon and eggs and spam
Let’s start out with the requirements that are applicable to all senders :
Make sure that domain spoofing is practically impossible by implementing SPF in a strict way (use the “-all” flag) and sign your mails with a DKIM key, where possible.
Make sure that recipients do not flag your messages as SPAM, either manually or automatically.
Now, this sounds like quite a general guideline… Google stuck a number to this statement and will start flagging you as a “spammer” if more than 3 out of your 1000 (0,3 %) mails to their systems get marked as SPAM.
That 0,3% doesn’t sound like a lot. And it isn’t.
That’s why you as an IT implementer should make sure that your customer is not at any time sending out unsollicited mail. Ever.
Activation of MFA, using a separate mailing software for addressing your customers en masse and securing the customer’s domain are a NECESSITY. Protecting mail flow is no longer a matter of just username and password.
Bulk sendersneed to tighten the situation a bit more.
Now, before we list what the requirements for bulk senders are, I have to make clear that being defined as a “bulk sender” is a very “grey zone” kind of moment.
In official terms of Google, they define a “bulk sender” as an entity that sends 5000+ messages/day.
We’ve seen this number being interpreted by Google themselves as a much lower number in a few cases.
Basically it’s advised, to apply the requirements below for ALL your clients, as it’s best practice to tighten security as much as possible in every case.
The grey zone interpretation style of Google’s own rules also suggests this in between the lines.
Obligatory SPF and DKIM as stated above. If you’re using M365 as mail solution, there’s no reason not to set this up. It doesn’t cost anything extra and it’s a small effort that can count as a quick-fix.
You’ve set up a DMARC record. Excellent!
Now actually make sure all your mail-sending clients (Outlook, CRM tools, printers, …) are conform with all the measures you’ve put in place.
Have a cloud-hosted CRM packet that sends over your domain name? Have it use either a M365 connector or add it’s fixed IP to the SPF record.
If it has DKIM support, use it. Always.
The number one bad guy in mass mailers that ‘ll get your domain flagged as “bad reputation” is not having a one-click unsubscribe button/link in mails that you receive after subscribing to them. (RFC 8058)
A “List-Unsubscribe” header needs to be present in the mail headers , as well as a visible unsubscribe link in the message body.
This link must not lead to a complex unsubscibe procedure with multiple questions, but must literally be “1 click”.
Another self-proclaimed Google/Yahoo standard in these grey zone rules, implies that the unsubscribe must be done within 2 days after request.
Some extra Pointers and tools
Make sure your “From” address and the from-header are the same. Especially the domain name in the address is the more important factor here. The term this applies to is called “domain impersonation“
Where possible (not in a M365 case), try to add a valid reverse PTR DNS record that corresponds to your outgoing mail server name.
In most cases, you have to address your internet provider in order for them to add a reverse PTR record as this applies to the fixed IP addresses given out by them.
Reverse PTR records only make sense in cases where you actually send mail from a fixed IP.
As an example : I have mail server running that announces “mail.zupertails.be” as DNS name in my headers, while having a fixed IP at the office, where the server resides.
My ISP needs to add mail.zupertails.be as a reverse PTR record, linked to my fixed IP.
I’ll spare you the tech details, but trust me on this 😉
Actually read the RUA and RUF reports that you set up in your DMARC record.
They can help you understand (even when it’s already too late and your domain has been flagged as “bad”) how your mails end up in spam. https://mxtoolbox.com/DmarcReportAnalyzer.aspx can help you greatly in understanding these otherwise unreadable reports.
There’s no quick-fix solution when your domain is flagged as “bad” or “spam”.
Domain reputation is partially an organic thing.
Every email receiving provider handles the timeout period in its own way and has no concrete documentation for outsiders available on the details as how long your domain is flagged on their side.
You can get extra information on the health of your domain and what’s causing it to suck on https://dnschecker.org/domain-health-checker.php
ARC headers are yet another way of verifying the legitimacy of your mail flow. https://www.validity.com/blog/how-to-explain-authenticated-received-chain-arc-in-plain-english/
Not every sender or receiver for that matter checks on ARC headers or allows the implementation of it.
If the link above is too much to read : ARC allows you to add a list of hosts, that allow the rewriting of mail headers, for instance in cases of mass mailing.
M365 supports ARC.
Stating the obvious : always send your mails in RFC 5321 and RFC 5322 format, that have their origins in 2008
Very funky and interesting tools that will help you on your way of becoming the ultimate mail flow troubleshooter :
DISCLAIMER : as of sep 2025 the method described below will no longer work according to https://learn.microsoft.com/en-us/exchange/mail-flow-best-practices/how-to-set-up-a-multifunction-device-or-application-to-send-email-using-microsoft-365-or-office-365
Precursor
Imagine the following : you recently migrated your mail platform from the “classic” POP/IMAP mailbox setup towards Microsoft 356’s mail solution.
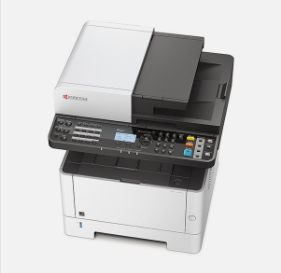
If you’ve done the M365 setup correctly and migrated everything towards your new cloud environment (see tons of previous posts 😉) you’ll soon run into some issues when trying to send an e-mail from your super-cool all-in-one printer/scanner/copy/fax machine, which is hooked up to the network and ready to send scanned documents in your (domain) name.
One of these issues being that you receive a NDR from your recipient relating to something like “Error 550 5.7.1 The user or domain that you are sending to (or from) has a policy that prohibited the mail that you sent” or anything basically that falls back to “we don’t trust this e-mail, because you smell of spam/phishing/malconfigured SMTP/…”
Your printer – in this example – still has port 25 and (for instance) uit.telenet.be as outgoing mail server (yes, I’m Belgian – hence the .be TLD on my site)
(PS : don’t want to read this entire story ? CTRL-F your way to “How do I set this thing up ?”)
Behind the scenes
What happened behind the scenes before and after your migration, concerning mail flow ?
Before your migration,
you used to have and old-school mail provider that allowed a lot.
Your recipients didn’t care much or already added your scanned mails with PDF’s in them in their white allow-list.
Maybe your mails got through, maybe they didn’t.
Your outgoing mail provider (let’s say it’s Telenet nv for the sake of the already mentioned example above) doesn’t really care what you send over their mail server, as long as you send it from an IP address on their network.
(a small note : at the time of this writing Telenet no longer accepts anonymous port 25; they need authentication through an @telenet.be address and use port 587 with TLS encryption)
(another small sidenote : Proximus still allows anonymous port 25 at this time *cough*)
Whatever the case, it would allow senders to send any mail they want from any e-mail address they want, as long as they use their own internet provider’s mail address.
After migrating to M365,
Microsoft kind of enforces you to add certain DNS records, before 100% completing the setup wizard of their Online Exchange offer.
✅ green ticks tick my own boxes as well, so as an OCD-enjoying IT guy, I can’t not complete this wizard :p
One of these records you have to create is an SPF record, which partly regulates the mail flow for your domain by defining. (more on the SPF record on [this page])
Microsoft is also kind enough to allow you to send over their own SMTP servers (good guy MS !!!) and provides certain regulations in order to be able to do so.
Server/Smart Host: smtp.office365.com Port: 587 TLS/Start TLS: Enabled Username/Email address and password: pretty obvi what this is….
In a perfect world, you’d be able to just enter these settings in your super-duper all-in-one printer and you’d be good to go. 👌
HOWEVER…
On the dreaded day of June 30, 2023 Microsoft disabled out-of-the-box support for a tiny little protocol we know as TLS.
Specifically, they disabled support for TLS 1.0 and 1.1 (fear not).
A lot of these printers use this “older” protocol and – as you might already guess – this complicates the entire sending-of-mail process.
Never fear, though !
Microsoft built in a backdoor/workaround in their own security enforcement and still allows you to send mails like you would in “days of olden”.
How do I set this thing up ?
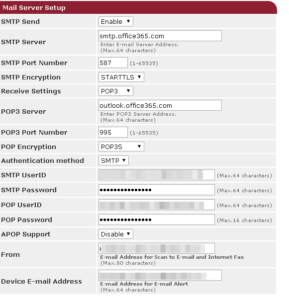
We’ll take this random internet screenshot from the mail settings tab in an OKI printer as an example :
Following all instructions you find on the internet, this would be the way to go.
And it is.
Using these settings in 2024 will result in a “cannot send mail” error on the printer.
Did you misconfigure something on this printer ?
NO.
Here’s what you need to change on the Microsoft side :
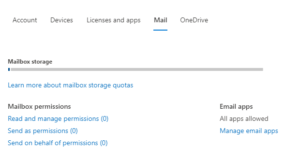
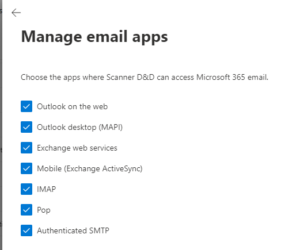
Through https://admin.microsoft.com browse your Users > Active Users and click the mail enabled user for your all-in-one device (Yes, you need to have a mail-enabled user for this)
On the screen that appears on the right, go to the “Mail” tab and click “Manage email apps“
By default “Authenticated SMTP” is not active.
Activate it and press “save changes”
That’s not where it stops, though.
Microsoft, sneaky as they are, still disable SMTP AUTH on a more global level.
So just activating the above, will result in the same sending error on your device.
sooooo, let’s go to https://admin.exchange.microsoft.com for part 2 of the config.
On the Exchange Online admin center go to Settings (in the left) column and pick “Mail Flow” (not to be confused the the “Mail Flow” fold-out menu in the left column).
One thing that needs to be de-activated is the “Turn off SMTP AUTH protocol for your organization“. (the tick needs to be unticked – super confusing option – double negatives and all)
Depending on the type of device, you may or may not need to opt-in the tick “Turn on use of legacy TLS clients“.
Even though Micro$oft disabled TLS 1.0 and 1.1, they still allow older TLS versions to communicate with the SMTP AUTH endpoint “smtp.office365.com”.
Press “Save”, give it a couple of hours tops and BAM, send at will with your Brother MFC something something, your mail enabled camera system, CRM software, …
I’ll leave the “plus addressing” tick for you to Google. It’s a cool feature, with little use-case.
Still cool though.
I haven’t talked about using an account that uses MFA, where you could use “app passwords” up to 2024, but due to security reasons Microsoft is discontinuing this feature
Lifting shrouds from IT-related mysteries is what we do here.
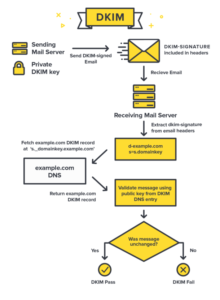
DKIM… yet another mys(t)ery to so many, but actually not that much rocket science as it seems. Let me explain :
Simplified as an acronym, DKIM stands for “Domain Keys Identified Mail” and is nothing more than “just another TXT record” in your DNS. In a previous post, you could read up about SPF records and how they can diminish the amount of spam being sent FROM your domain name. DKIM takes this to a next step.
It’s the implementation of DKIM that will require some extra feedback from me, though.
Extremely simplified
Woodpecker.co explains DKIM as following :
“Take Game of Thrones to get the bigger picture of DKIM. Ned Stark is sending a raven with a message to king Robert. Everyone could take a piece of paper, write a message and sign it Ned Stark. But there’s a way to authenticate the message – the seal. Now, everyone knows that Ned’s seal is a direwolf (that’s the public key). But only Ned has the original seal and can set it on his messages (that’s the private key).”
Quite the analogy, if you’ve seen GoT (and no spoilers, even !)
What happens when using DKIM ?
The entire concept is based on encryption of a specific value that uses a public and a private key, that are generated in pairs and therefore cannot exist apart from each other.
The public value is stored (obviously) in a public location where all e-mail servers and clients can access it : the DNS server that holds your domain name (OVH, Skynet, Godaddy, Combell, …)
The private value is sent in an encrypted way over internet and can be verified through means of that private key, to check if it used the original correct signature.
It’s comparable to how an MD5 checksum works
(with the exception that at the time of this writing, DKIM can not yet be broken and it’s possible to “fake” an MD5 lol)
Image courtesy of postmarkapp.com
This hidden signature is then verified by the mail server, through which you send your signed mail, as well as all other mail servers where this message passes (in its original form).
Because…. the signature is added to the mail headers and is completely independant from how SPF records work, a proxy’ing mail server that just passes on your message, retains headers.
Theoretically, your mail could fail on an SPF, but could be perfectly valid on a DKIM basis !
Fool-proof ?
Is this method a fool-proof way of confirming ALL mails from your domain are safe now ?
A simple answer : NO.
DKIM is kind of the reverse of SPF, whereas SPF tells the receiving mail server what mail NOT to trust.
DKIM tells the receiving mail server that this specific mail, sent from this specific source is – in fact – OK to receive. DKIM does not guarantee that mails from your domain name, sent from a source other than the one defined in the key verification, are in fact safe, because the key in the verified mail message only counts for the specified source.
“Should I not bother to use DKIM, then ?”
You should still try to implement DKIM wherever possible, as all methods of securing your mail flow and getting spam/phishing mails out of this digital world, are most welcome.
What does DKIM look like & “comment ça marche” ?
Enough with the theory; let me explain how (and when) this works.
First of all, your own mail server, through which YOU send outgoing mail, has to have support for DKIM key generation.
Most ISPs (I think we can say “all ISPs”) will not use DKIM, as this would mean having to sign every friggin mail message that the millions of their customers send out on a daily basis.
All mail software would first have to talk on an encrypted basis to a public SMTP server to stuff that signed key in the mail header of their own mail message.
Seeing as most ISPs allow sending over their mailservers, without any authentication whatsoever, except for sending from their IP address range, this can ony mean : a big no-no.
Onward.
If your mail server supports DKIM (we’ll be using Microsoft 365 as an example), we can go ahead and create a DKIM.
https://learn.microsoft.com/en-us/microsoft-365/security/office-365-security/email-authentication-dkim-configure?view=o365-worldwide explains in heavy detail how to create a DKIM pair on a M365 mail-based subscription (Exchange Online in short).
Go ahead and read the article.
The come back here, for a small moment of enlightenment.
…
All caught up?
Good.
The original private key is never shown and is only known to your very own mailserver.
You get to see – usually in the form of a next-next-next wizard – the entries you have to add as a CNAME record in your own DNS server that hosts the domain name from which you’re sending mail.
As cryptography goes, the mailserver recieves your request to send a mail to somebody.
Next, it adds a specific unique mail header to your outgoing mail, based on its own private key, in combination with the key known to the public (and thus shown in your DNS records, for others to reverse verify)
Before showing the layout of the DKIM record, let me show you what a signed mail header looks like.
If you’ve been following my instructions, you’ve already seen a DKIM record on the Microsoft website mentioned above, by the way :p
Every DKIM signed mail starts with “DKIM-Signature:”
The obvious part “v=1” defines the versioning (duh). Ironically at the time of writing, the version will always be “1”
“a” defines the signing algorithm, usually RSA-SHA or RSA-SHA256
“d” stands for the domain name of the sender
“s” is short for “selector” which can be found in the corresponding DNS record (in this case) newyork._domainkey.example.net
“c” is the abbreviation for “canonicalization algorithm”. A tricky one to explain, but I’ll try my best.
You can see it contains 2 values. They represent header/body and define the (dis)allowing of slight header changes in mail forwarding. “Relaxed” allows a certain change in the header (for instance when forwarding a mail). “Simple” just tells the receiving mail server, that no change in the mail header part is allowed for it to still be a trusted DKIM key.
“q” is for “query” and tells the receiving end how to perform the DKIM check.
The q-part is optional. At the time of writing, the only valid entry here is “DNS/TXT”, which defines that a DNS lookup needs to be done, looking into a certain TXT field.
“t” is the timestamp
“x” falls together with the timestamp and stands for “expiration”, in case you have a fast-rotating key-pair in your DKIM setup and want to assure the receiving end of a higher security level.
“h” lists the signed header fields …
…while “bh” is the hash for the body part of the mail
“b” is the actual signature data.
Should you totally want to geek out more on the RFC for DKIM, you can get your groove on at https://dkim.org/specs/rfc4871-dkimbase.html
The DNS record(s)
Why did I keep this part for last ?
You could see in the above example, that the RFC leaves space for a different way of reading your DKIM record.
For now, we don’t have a different technology other than DNS to exchange DKIM data, but if DKIM were to be upgrading, so to speak, the possibilities would not be limited to DNS.
The actual public key would look like this :
NAME : nameofyourselector._domainkey.example.net
TYPE : TXT
CONTENTS OF RECORD : v=DKIM1; k=rsa; p=KLJHLHkjhkhkluhiukhjiulYUHKJUIYUYNJKHLKHIOUHJhjkhkjhklhjkh
The content of this record will be provided by your mail server, when you go through the DKIM generating process
A different approach is the use of a CNAME record instead of a TXT record, where your key is stored elsewhere.
Depending on the suggestion your mail server gives you, you’ll implement one or the other.
Your CNAME record could look like this :
NAME : nameofyourselector._domainkey.example.net
TYPE : CNAME
CONTENTS OF RECORD : heresmykey.something.anotherdomain.com
There we have it.
Theory and samples.
If you have any questions, don’t hesitate to contact me by mail, postal pigeon, smoke signal, …
…and that’s because of the addictiveness of the game (the release of natural dopamines helps a great deal too :p)
To keep everything spicy while playing, there’s a ton of things you can do to improve your gameplay experience.
In this post I’ll be discussing fun upgrades for the PC version of Beat Saber, in case you’re still playing the “vanilla” version. (I’ll post something on upgrading your Oculus version as well in an other post).
If you’re already using mods, you might see an other perspective and/or learn some new things. Or you could even teach me some new stuff, posting your comments below.
First thing’s first.
Making life easier is what it’s all about.
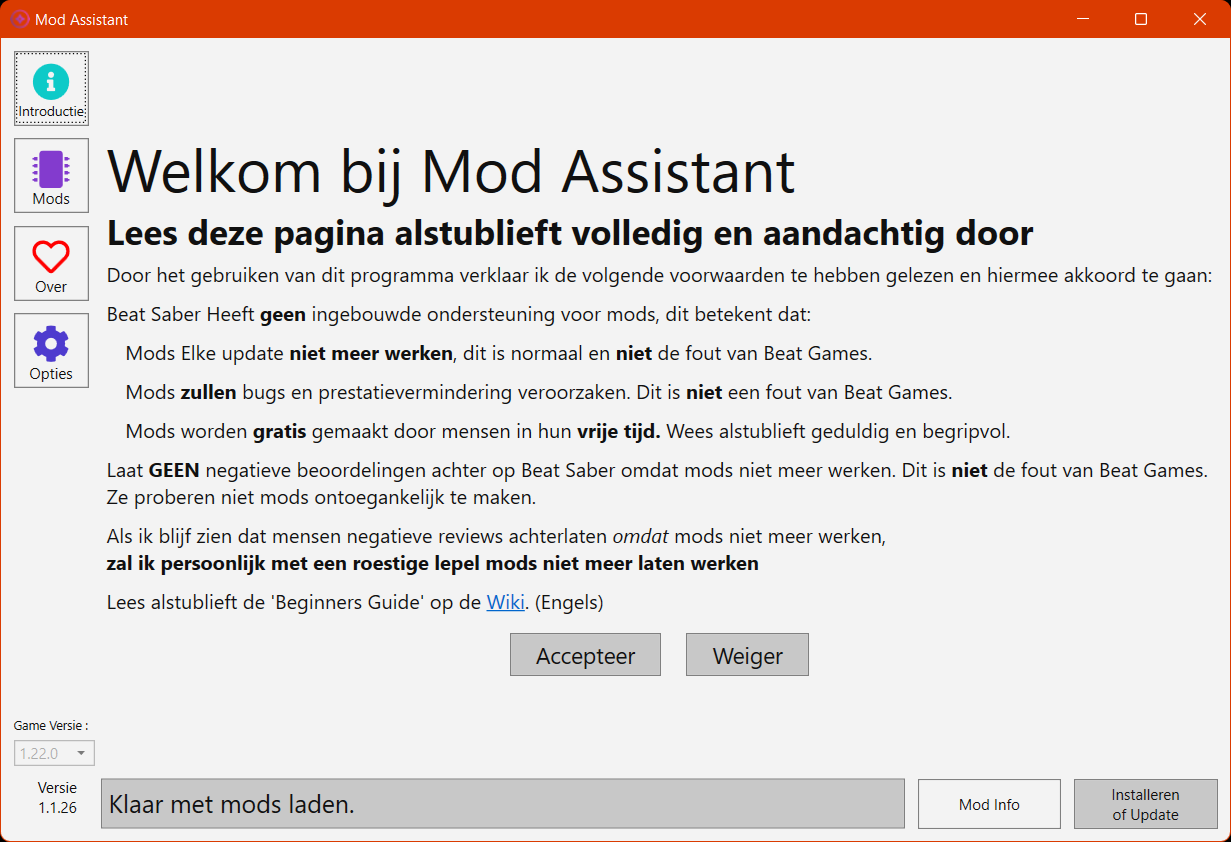
After installing Beat Saber, you can surf to the Mod Assistant Github page and click on the “Download Here” link on the page to get the latest release. Modassistant also auto-updates, as a lovely built-in quality-of-life feature, by the way.
Follow the installation instructions on the Github page, after which you’ll be presented with a screen similar to this :
Click accept and then click on the Options button on your left.
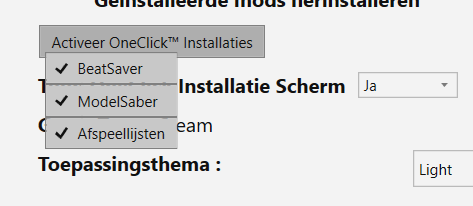
Click the “Activate OneClick Installations”
…and make sure all three options are activated. You might be welcomed with a security popup from your computer depending on your Windows security settings.
Afterwards, click on the “Mods” button and install all of the default selected mods, by confirming the “Install or Update” button in the bottom right of the Mods window. They will be your absolute basic list of required mods.
Always make sure that you boot up and shut down Beat Saber at least once, after installing the mods through Modassistant.
(Warning, should you be unlucky and get an ‘unsupported version’ notification, there’s ways around that. More on that in a later post on downgrading Beat Saber to a compatible version)
Now… on to the list of mods.
Custom Songs
Loading more than the default songs into Beat Saber, is where the fun part of the customizing starts. Who doesn’t want to rock out to some superhappy anime theme or headbang to the latest Rammstein song ?
Didn’t find anything that tickled your fancy in those 65000+ songs ?
Why not create your own song in popular tools such as Chromapper or MediocreMapper ?
Although creating your own songs is something for an other post…
It’s optional, but I still strongly recommend creating accounts on Bsaber.com and Beatsaver.com
The sites mentioned above use the same database in the background, but Bsaber (aka Beast Saber) has a good search engine and lists specially created song playlists. It’s also used as a helper tool for adding custom songs on the standalone version of Beat Saber on the Oculus Quest). Beatsaver on the other hand, allows you – as a content creator – to upload your manually created (the “manual” part is an important factor) Beat Saber maps.
In the chapter above this one, I let you activate OneClick installations.
This is where that option shines, as ModAssistant allows you to add songs to your game in – you’ll never guess it – one click.
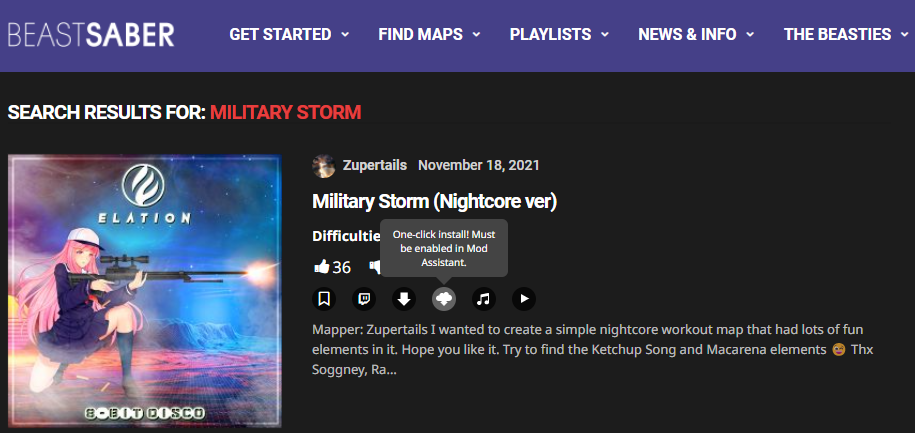
Example from https://bsaber.com/?s=military+storm
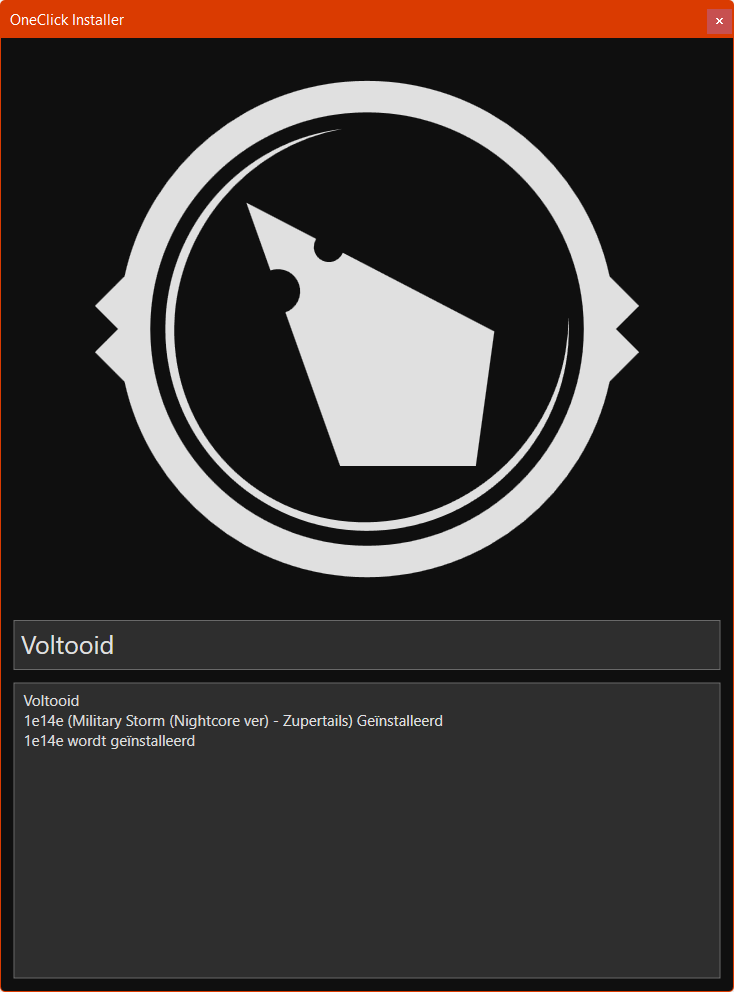
Clicking the little cloud icon opens ModAssistant’s installer tool (after maybe a security popup from your browser)
Et voila, your song has been added to the list of custom songs within Beat Saber and is now playable in a separate menu tab :
Have fun !
Competitive spirit
Competition is one of the things that keep me going.
Beat Saber’s built-in scoring system has a neat feature where you can see your Steam friends and their resp. scores.
However, when you’ll start adding custom songs (see above), there’s no way Beat Saber can save its scores for these songs as they’re not part of the “official” songlist.
The tool you’re going to need here is the ever-so-popular “Scoresaber“, which basically is a global ranking system for custom songs.
Log into scoresaber.com with your Steam credentials in order to link the SC account to your personal Steam account, so you can start playing in the “big league”.
Modassistant (above) has Scoresaber as a built-in mod for you to activate, so that your Beat Saber will automatically upload scores to the global ranking database and you can get competitive with your friends or get an understanding on where you place in the world and country rankings.
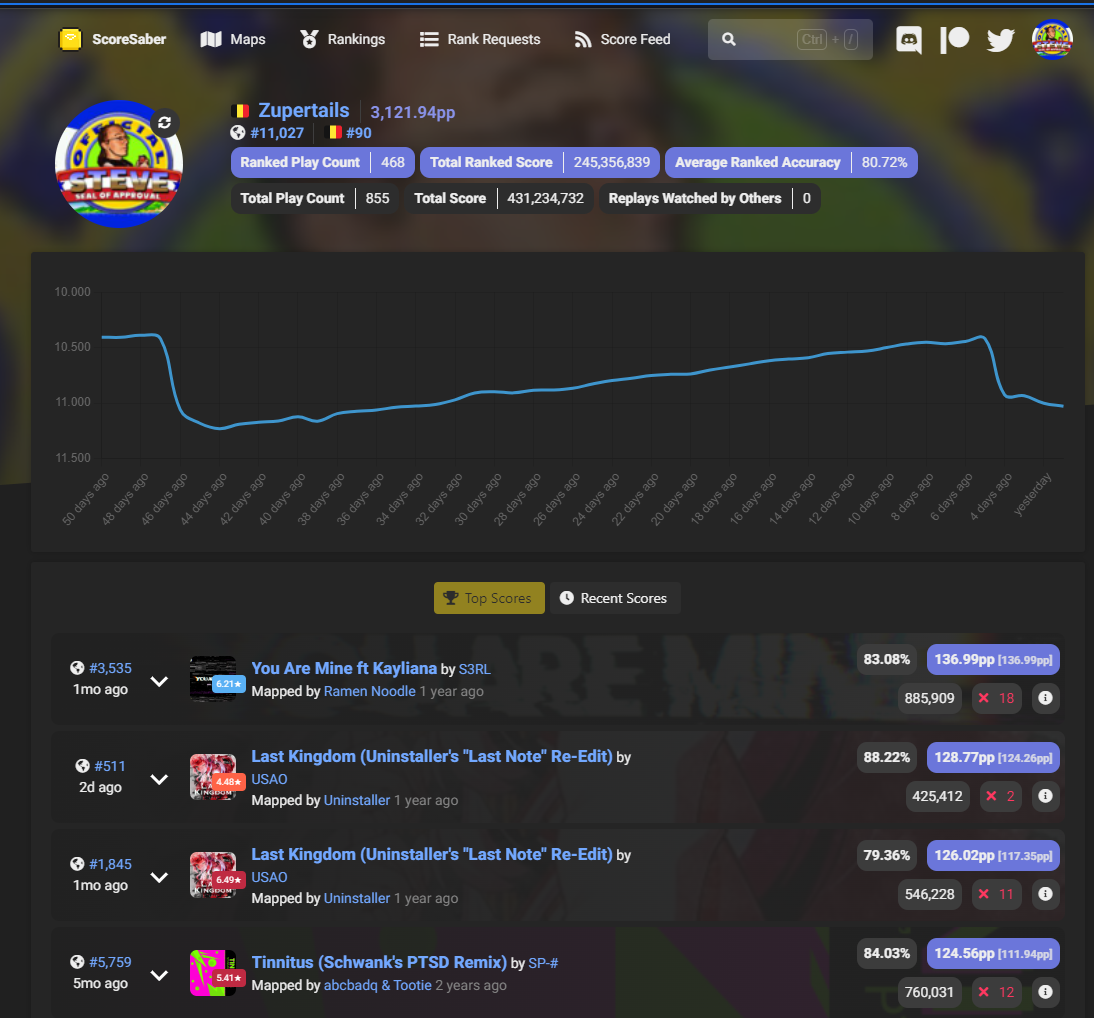
Your personal page will look something like this, after a couple of ranked songs :
Sample scoresaber page. Yes, I’m not a pro :p, don’t judge me.
(For a more up-to-date view, check the link to my profile here.)
Scoresaber also has an great API, documented on https://docs.scoresaber.com/ (you’re welcome – this specific URL is badly documented everywhere), so that (for instance) you could create your own bot on discord or create your own personal ranking system among friends, if you’re a little tech-savvy.
For a more detailed explanation on how the PP (Performance Points) system in Scoresaber works, see https://bsaber.com/indepth-guide/
Mostly, just focus on your accuracy and keep in mind that the main idea is to have fun.
More competition !
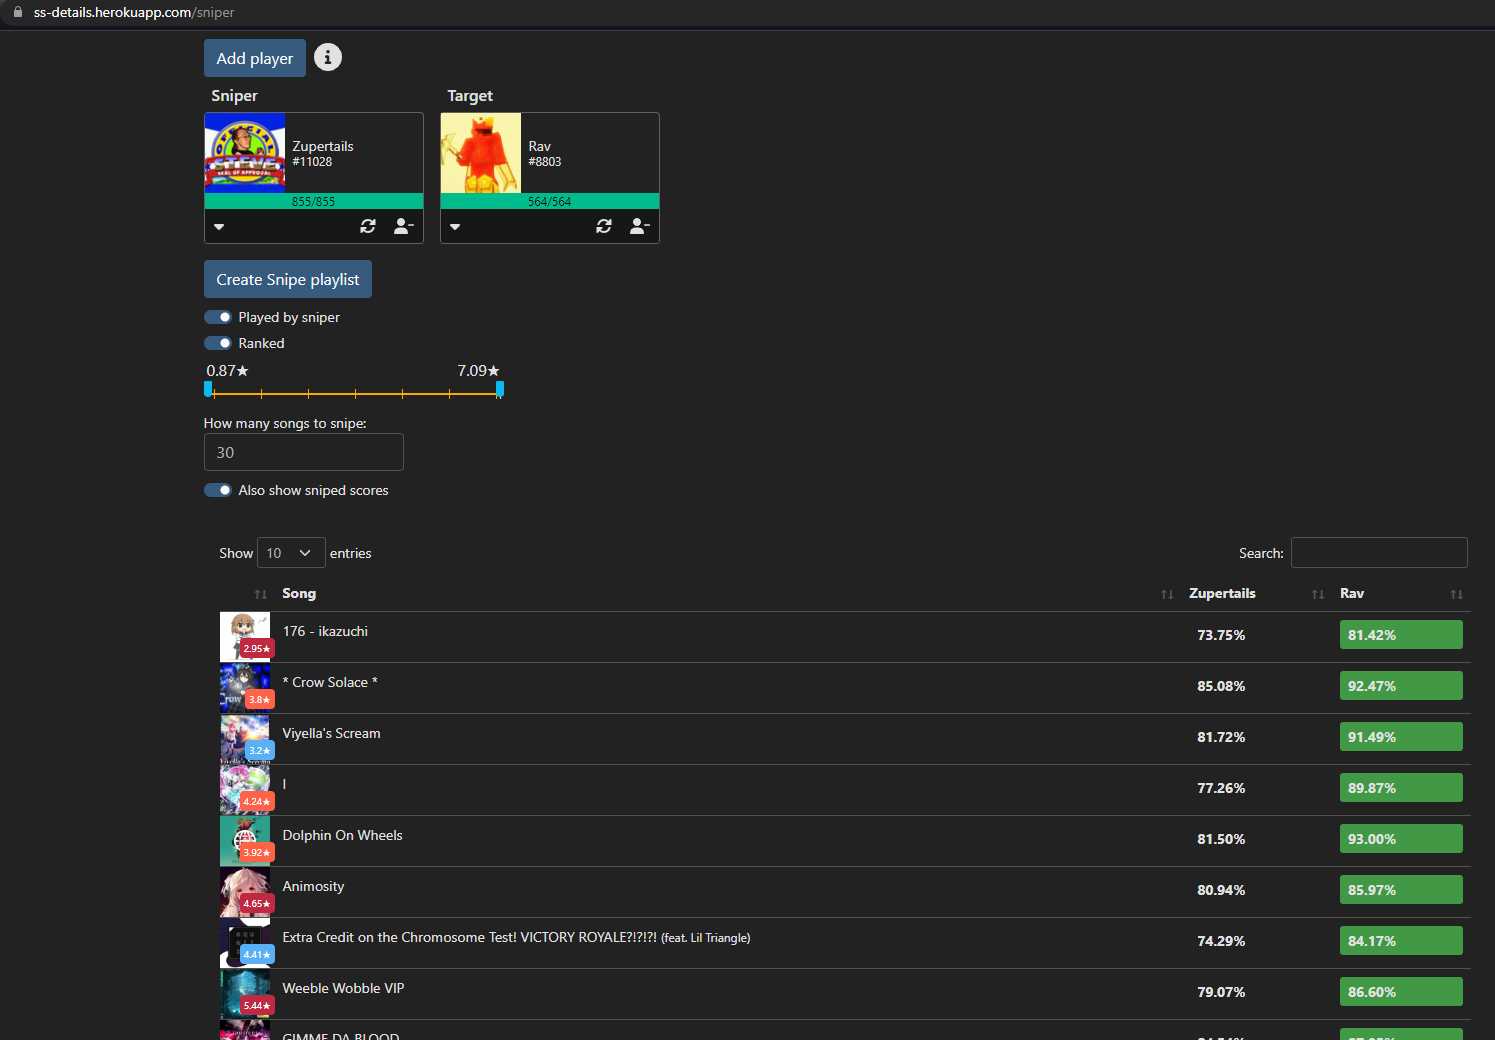
The term “sniping” in Beat Saber refers to specifically targeting somebody’s score on his or hers best performed songs.
In order to get better at Beat Saber and increasing your score/rank, sniping is actually a pretty efficient way of working yourself upwards in terms of skill.
One of the mods you’ll need here is “Playlistmanager” from Modassistant, if you want to save yourself some trouble in manually seeking songs.
This specific site requires you to add 2 players. The sniper (usually you) and the sniped (the player that is some ranks above you on Scoresaber is a safe an typical choice)
Click “Create snipe playlist” after fiddling with the options and an A.I. will generate a playlist of songs for you to beat your target’s score at. A file with extension .bplist will be generated and downloaded.
Now open Modassistant and go to the Options tab, where you will click on “Install playlist”, where you will select the recently downloaded .bplist file. This will start downloading and installing all songs required for you to snipe your target.
Your new playlist will appear at the top in this menu (screenshot)
Have fun improving your skill in this competitive way !
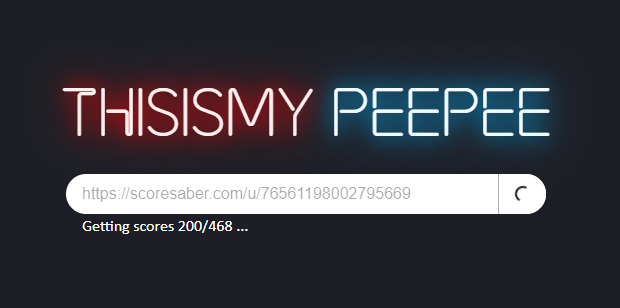
Increasing your PeePee (you heard me…)
An other efficient way of improving your Beat Saber skills is to have another A.I. analyze your Scoresaber profile (see where the Scoresaber part is getting more and more important ?)
You’ll also need Playlistmanager as in the post above.
Entering your personal Scoresaber URL will have the site instantly starting the analysis.
This is my Peepee
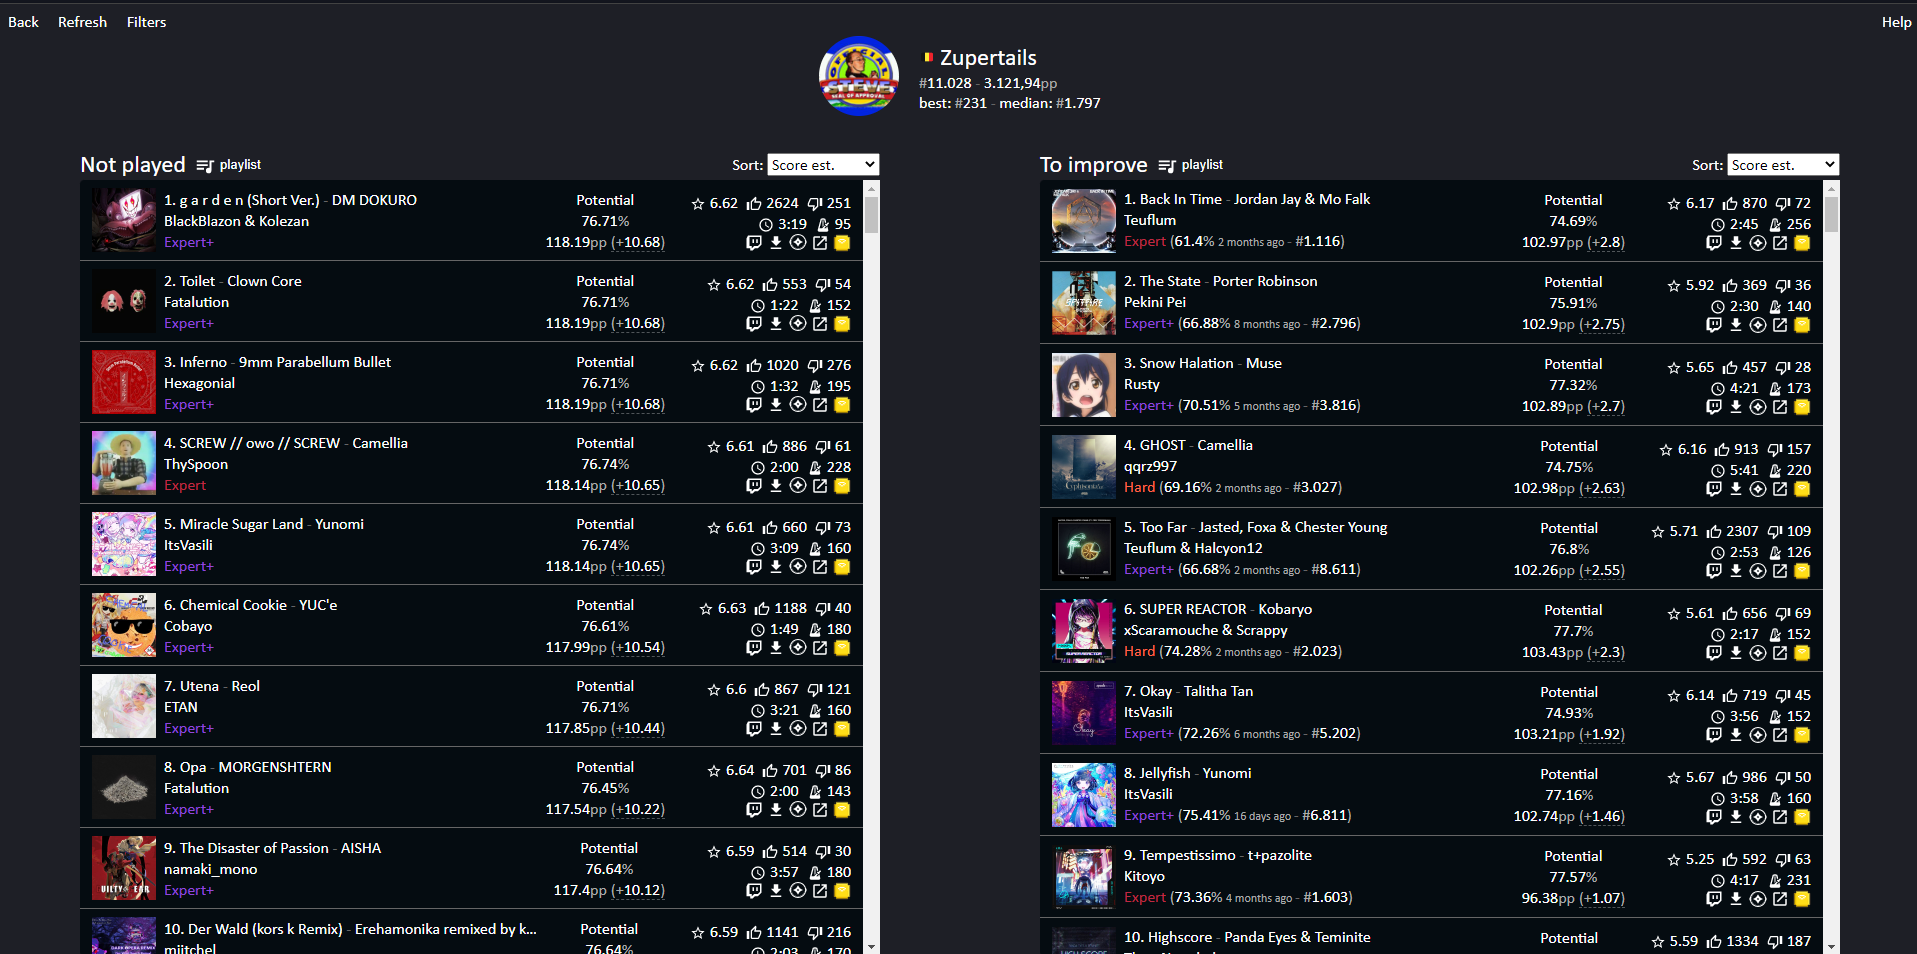
Give it a couple of seconds and you’ll be presented with a screen that offers you 2 downloadable playlists.
Not played : after analysis of your current scores, the A.I. presents you with songs that seem good training levels and (mostly) will be completable in days or weeks, considering your skill level.
To improve : the A.I. gives you a list of songs that it thinks you can improve, based on your current scoring profile.
Both playlists have a little “Playlist” button that allows you to either download a .bplist file or install it instantly through the OneClick button.
Have fun getting even better !
Customize EVERYTHING
Been playing Beat Saber for weeks or even months and you’re starting to get tired of the same “dull” look of your sabers ?
Does the amount of particles flying around on the screen bother you or can your PC not handle all the stuff on screen ?
Check out a variety of mods such as Saber Tailor, Custom Platforms, Particle Overdrive, Tweaks55 and whatnot.
Modassistant offers tons of extra plugins to improve or upgrade your Beat Saber experience in tons of ways possible.
I’m not gonna go over all the possible mods, as that’s something that others have done before me, but just be aware that the options are almost limitless.
An example website where you can get custom sabers :
Some Beat Saber levels have (either optional or obligatory) extra functionality built in that graphically increase your experience
I have a quick and dirty unedited version of the song “Somewhere out there” that show the wonders of mapping extensions.
I’m also holding some custom sabers to give you an idea.
You’ll sometimes bump into songs that have a greyed out Play button as they might require one of these extensions (it will be explained which one(s) you are missing, by a small question mark next to to the song preview window)
Check out the following list of drool-worthy levels :
The main reason I bought my VR kit is to get back in shape.
I used to play Dance Dance Revolution “back in the days” to build up some stamina.
Then, life happened and I slowly grew out of it.
Being competitive in spirit, I needed something extra to get me in shape, apart from Scoresaber.
That’s where “YUR” kickedstarted me.
YUR is a free piece of software that installs on your Apple/Android device and gaming computer and brings fitness to a gaming level.
It has the ability to sync 2-ways with Google Fit and Apple Health and has an overlay in VR games that track your movement progress and calculates your burnt calories.
I got introduced to YUR in another rhythm game : Synth Riders.
This has a built-in YUR watch that – by the flick of your wrist – shows you the calory meter like a real smartwatch.
Give it a try, if fitness and health stats get you going !
Extra’s
There’s a couple of cool mods out there that are still worth trying :
Beat Together : https://github.com/BeatTogether/BeatTogether holds the download for a Beat Saber plugin that allows multiplayer for custom songs (installation instructions on the site). A real fun feature I only got to know waaaay after I started playing B.S.
Enhanced Stream Chat : included in Modassistant, this plugin shows you your Twitch live chat on-screen while playing. Fun for quick interaction.
Also check out LIV’s streamerkit as a great alternative
Counters+ : want to see live how good you’re doing in Beat Saber apart from a simple ranking system ? Counters+ show you in full detail what you’re doing in terms of accuracy and hit percentage.
Microsoft just recently sent me one of their spammy messages that I usually overlook.
Instead, this time, it was a bringer of good tidings. Finally, Microsoft will force-feed you or your users with documentation, tips and tricks on how to use your Office 365 products and get the most out of it. There has been a built-in training centre for admins as well as regular users in the portal.microsoftonline.com landing page for a while now, but – speaking out of personal experience – not a lot of end-users visit this page.
Kindly read the message below, that contains the interesting part of the original mail :
The mail :
We’re pleased to announce that starting on November 29, 2018, all users of Microsoft 365 and Office 365 will receive helpful product training and tips for services in their subscriptions via email. This feature has administrative controls to enable and disable.
[How does this affect me?]
After this change takes place, email communications will be enabled-by-default for your organization’s users, allowing us to provide product training and tips aimed at helping them increase their productivity and to maximize their utilization of the products and services they use most. End users will only receive emails regarding services that they have been enabled for, and you can control whether or not your users receive these communications in the End User Communication tab in your Office 365 admin center. Your users also have the ability to opt-out of receiving these emails on an individual basis by accessing the Security and Privacy pane of their My Account Portal.
This feature will be on-by-default for all Office 365 and Microsoft 365 organizations on November 29, 2018.
If you wish to disable this service for your users, you can do so between now and November 29, 2018 and your settings will be honored.
[What do I need to do to prepare for this change?]
If you prefer your users receive product training and tips that are all tailored to the services in their subscription, then there’s nothing you need to do to prepare for this change.
If you do not want us to send product training and tips to your end users, please follow these steps to disable:
Should you eventually still be interested in Sharepoint Online after reading all the horror-stories and getting yourself mentally up to the task of making this key decision, prepare yourself for a lot more decisions 😉
If you’re a Belgian SME, you can probably skip most of this thought process. If you’re a somewhat larger company or an SME according to American standards, you’re in for a treat if you love planning things.
Consider the following tasks, depending on the size of you IT implementor and the size of the Sharepoint customer :
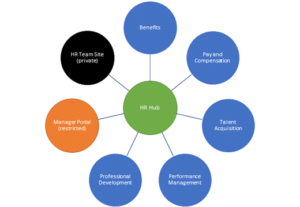
Plan hub sites
In short, hubs connect your libraries and sites into one easy-to read-and-manage central entity with its own look and feel.
The example picture (for a larger company) shows a specific hub (in green) for the HR department, where all department libraries are centralized.
The general idea behind this is to create a seperate hub for (e.g.) Finance, Marketing, Sales, …It’s common practice for smaller companies to put everything in one hub (with maybe the IT documentation in a separate one)
Managing your Search and Discovery result sets.
You can take feature this as far as you want. Managing search results in a Sharepoint environment and administring keywords can either be something you completely let live a life of its own OR you can fully manage your keywords, result templates OR anything in between.
Actually creating the site and developing graphical layout, customizing content.
Will you be sharing your documents externally to users not in your organization ?
Mentioned before in the previous post : plan the physical content of the Sharepoint site.
What will you be showing your users ? Will your SP environment become a complete file archive of all your documents or will you just be using the platform’s collaboration function on a project-basis ?
As mentioned before, small enterprises are likely to use 1/10th of Sharepoint and might require a very limited amount of planning, to the point where it even comes down to replicating the original folder structure of a to-be-decomissioned on-premise server.
Sounds like a mouth-full, but practically speaking this is nothing more than a copy-paste action (albeit a tad more technical in the background)
On a note of keeping things simple and understandable, I’ll provide examples for an imaginary small company that starts using Sharepoint for the first time, so we can skip the whole larger planning phase and go straight to using Sharepoint Online (SPO).
Situation sketch
Remember our straw-producing company in an earlier example ?
They’ve gotten inspired by the entire Office 365 thing after experiencing the fun technical advantages of their mail and decided to move their data to ‘the cloud‘ as well.
Being the Belgian SME that they are, Shortstraw LLC has data hanging all over the place, spread among various computers, USB disks, cell phones and tablets.
They started out without a centralized server and are now ready to move to Sharepoint as a data storage platform. (or at least, that’s what they told you *dramatic music*)
Questions, questions, questions …
You, as IT partner for Shortstraw, can now start a limited amount of planning and meet up with CEO and CFO Oliver and Annie.
There’s a certain amount of practical questions you will need answers to, before even starting your move to SPO.
Total amount of data in GB/TB ? This M$ page will tell you more about these limits.
Do they want all data synchronized on their computer(s) as local files ?
Will they be sharing files through SPO (especially to external sources) ?
What files will you split up into a personal Onedrive for Business account and a Sharepoint library?
How fast is the internet on-premise ?
Free disk space and operating system on the machine(s) that holds the data. In case you’re wondering : Windows 10’s native Onedrive has support since halfway 2018 for so-called ‘streaming files’, which downloads your files on-the-go when you open it from Onedrive. Windows 8/7/… all need an actual physical copy on the disk when synchronising.
…
Setting it up. Getting started. Doing your thing.
The right tools for the job.
When starting a migration to Sharepoint Online, a couple of tools come to mind. There are a few nifty pieces of software that can do the job quite well.
I’ll be discussing the last three, as they are free of charge (not counting the actual license cost of your O365 subscription obviously) and have little to no learning curve.
For the ease of this example, I’ll just assume we have some structurally placed files and folders on an on-premise file server/NAS/other easily accessible location for a Windows computer.
More prep !
Nothing ever comes easy (except for your mom – obligatory mom joke, couldn’t resist). More prep work is required before we can move our files to SPO.
A small theoretical explanation (practical examples will follow, don’t worry) :
First of all we’re going to want to create the location(s) where we want to store the files online. This is usually done by creating one or more document libraries. Simplified, you could compare them to shared folders on a file server.
Best practices tell us to set your initial user rights (more on this later) on a library basis, if necessary.
In a more extreme manner, you could even create Sharepoint subsites or Site Collections.
Secondly, you’re going to need to create security groups to apply to your libraries, where we’ll be removing the default security settings, in order to set specific rights to specific libraries.
This can either be done in Azure AD or straight from Sharepoint.
My n°1 suggestion is to keep the admin user as an owner of your libraries – or at least as power user – as we’ll be needing a specific user account for the automated migration process anyway.
If you’re into manual labor, you can have your users perform their own migration, but this is ill-advised.
My three free tools
Before you start to panic, I promise I’ll get more into detail about every method mentioned. The examples below will just give you a sneak peek on the easy of use.
Sharepoint out-of-the-box upload/drag-and-drop
Quite straightforward.
You either choose ‘Upload’ in the menu above your library or just drag and drop your file to where the library is located on-screen.
OneDrive synchronisation
Same approach, different method.
You select the ‘synchronize’ button above the library, whereas you’ll get a verification from OneDrive to see if you really want to start a synchronization between your computer and this specific library.
Sychronizing will require a significant amount of disk space if you’re not working on Windows 10 (W10 uses the aforementioned file streaming method)
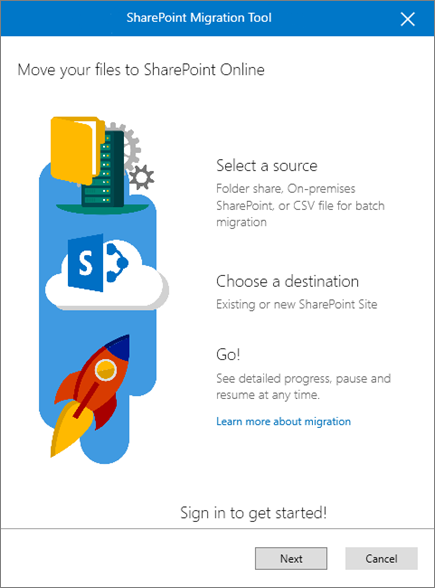
Microsoft Sharepoint Migration Tool
This tool automates the uploading (and pre-analysis) for your data towards the Microsoft Cloud.
Preferably, use the migration tool, when all your local data is stored somewhat centralized. This tool is best run from the (Windows) server itself where the data is held, for speed reasons, among others.
Microsoft SPMT has a very easy and intuitive look and feel, but will require you to create the libraries before starting the migration process.
Also make sure you have sufficient disk space, as this tool creates a temp folder as large as the entirety of the data to be transferred. (temp folder can be selected in the migration options)
That’s all folks.
Prepare for a hands-on moment in the next Sharepoint post !
Microsoft simply puts it down as an “Online Collaboration Platform”, which is actually one of the most simple ways of explaining the whole thing.
Sharepoint can be used as a sort of online organized file dump, but that would be something like using only the glove compartment of a Ferrari.
It’s often compared to a mixture of “Google Drive”, “Huddle” and a WYSIWYG website editor like WordPress, where you can manage all of your corporate content (to a certain limit), create intranet webpages, automate business processes through workflows, build custom apps etc.
I’ll mainly be talking about Sharepoint Online (SPO) , from hereon. Know that there exists an on-premise version as well, that had its root somewhere between the year 2003 and 2007, but still exists on current-gen Windows servers.
Is Sharepoint the right product for you ?
As with all products, it’s best to perform a study on why you would need it and if it’s the best solution for you, before you actually buy it. There’s a very big change SPO might not be exactly what you need and there’s that other chance, you’ve struck gold and it fits your needs perfectly.
A 30 day demo can be obtained through various means, of which the classic Microsoft demo environment is the most popular one : https://products.office.com/nl-be/try
If in doubt –> always demo it first.
Consider the following questions before usage :
Do your employees work remotely?
Do your employees often move from one client location or meeting to another?
Do your employees need access to various devices so they can do their jobs?
How are your employees currently accessing the content that they need?
Do you have customer-facing requirements, like a place to share information, an online catalogue, an online Request for Information form, or an online Request for Quote form that your customers need to fill out?
Do you share documents with your customers often?
Are you using USBs to transport and work on presentations, requests for information, or marketing collateral?
Does your staff ever complain that they wish there was an easier way to access your content?
You might have guessed, from the commercial way these questions have been formed (thank you, proserveit.com) , that Sharepoint will be a fitting answer for all of them.
I’ll also gladly push away some common misconceptions surrounding Sharepoint and its use, since potential users will start Googling and will eventually find articles that scare them away from this online platform.
Sharepoint is just a place to store your files
NO!
It’s a friggin’ collaboration platform. You’ll be able to work on project-based or group-based items, follow up your colleagues, create automated tasks, …
The IT department will be in charge of setting up our environment and maintaining it
NO!
Maybe the IT department will need to explain the very concept of Sharepoint and set up the initial workspace environment a bit, but you as a user will be very able to create your own project pages, invite colleagues, change the look and feel of your SP workplace and much more.
You can’t customize Sharepoint. It will look like any other SP environment
NO!
Sharepoint (Online as well as the on-premise version) has a relatively easy way of customizing every page and/or creating templates based on your company colors or personal preferences. Not only the page theme, but also the way your libraries are shown and much more can be fully customized.
SP is not user-friendly
NO!
C’mon, really ? You’ve worked with Microsoft products before, right?
Can you really say Microsoft’s end-user products are not user-friendly ? And be honest !
If you can actually find a software package by M$ that you find to be user-unfriendly, try to find an alternative and tell yourself again how great that alternative works out for you, will you ?
As with all new software, you might have to learn the basics, but even creating a new Sharepoint project or page just feels like typing a Word document or creating a flyer in Publisher.
I’m pumped! Let’s do this!
Before you get all over-hyped, there’s a few things to take into consideration before moving your data to the cloud and de-comissioning your old server(s).
Doing so, will avert potential headache afterwards, for either the IT implementor as for the users that will actually be … using … Sharepoint.
The baseline here is : “Don’t do a full copy-paste”
Just in case, we might need this document…
Take a breather and think about how much data you’d like to move over to SPO.
Do you really want to bring over all those old archived files, that you will never ever be looking into?
There’s no real harm in actually copying them over to SPO, but wouldn’t you rather work in a clean and clutter-free environment than be surrounded by piles of old paperwork ?
New document (1)(1)(2)-final_by_john.docx
Various options for versioning
For the love of God/Allah/Vishnu/The Flying Spaghetti Monster/…
Having a document like this is bad enough practice as it is, but don’t bring this over to your new Sharepoint environment.
Judging by this filename, there have been tons of new versions of this document created over time, while keeping the original ones around for … I don’t know … archiving ?
Sharepoint has built-in versioning, that can be customized to your heart’s content : approval options, type of numbering, amount of copies to keep, …
You’ll only end up using more storage than you actually need as well as creating a chaotic and unstructured work environment.
Next to all that, the above filename situation might be created by multiple users trying to access the same file and saving it as their own version.
Again in Sharepoint, you can actually co-author a document or even set a certain lock notification on the document for obligatory check-out of the document before editing it.
No more excuses 😉
Don’t think “Files and Folders” anymore
If you know how a database structure works, you’ll have better insight in why and how you shouldn’t be using the classic files and folders layout anymore, because Sharepoint, when you simplify it, is just one giant database.
Don’t feel bad if you don’t know what the internal workings of a database server are. I’ll gladly explain the Sharepoint way of thinking, so that you get the most out of your new structural storage.
First of all, keep in mind that Sharepoint is a collaboration platform. The essential part here is that one word : “collaboration“.
Obviously there’s still a need for rights and structural placement of folders, but the main idea is the working-together part.
You can create cross-functional groups, completely separate from your existing classic company structure where you now have a CEO > Management Group > Employees rights piramid.
Consider the people who own the file content, as opposed to the ones that get to “use” it and base yourself on “projects” instead of folders. Create Sharepoint pages per project, for instance.
Try to add as much logical keywords to your documents instead of categorizing in one single folder. Remember those many times you thought about that one file that was good for folder A , folder B and even folder C, and you had to make the decision of putting it at least somewhere?
Well, Sharepoint uses sort of a labeling system called Enterprise Keywords, where the actual location of your file matters less than the correct label(s) you attach to it.
Just make sure that the users who need this file, have access to the file, folder or library it’s in and you’re good to go. The Sharepoint search function will do all the work for you.
Not even to mention the awesomess of the program called “Delve“, that digs deeper in projects, files, statistics etc.
Planning your libraries
In Sharepoint everything is divided into lists and libraries. Remember my database reference above ? Well, a list or library is nothing more than a database table.
As with all database systems, there’s a certain limit to what you can do. In this case, the often discussed 5000-items limit in a Sharepoint library is to be taken with a grain of salt.
You might have heard from the above mentioned item limit.
The number of items in a Sharepoint library should not exceed 5000 according to Microsoft advice. So, what happens if you get you 5001st item in a library ? Does the internet explode ?
Let me elaborate on this.
First off, the Sharepoint definition of an item is either a folder or a file, meaning that if you have 200 subfolders that contain 1 file in total, you have 201 items.
This whole limit thing has to do with the indexing speed for the software that runs in the background.
In order to quickly find your data, your server environment needs to read and analyze your data first, after which this analyzer-process writes something like a table of contents.
This table of contents is then used for search actions, because a ToC reads faster than actually having to scan your documents on-the-fly.
Microsoft has set a pretty round number on this, so it is easily remembered.
Should you go over the limit of 5000, the automatic indexing process simply becomes not-so-automatic and will take around 24 hours, depending on the process timing by Microsoft, which is something you yourself cannot change.
There’s actually another limit : 20000 items. Here, the indexing starts to go wrong and may start reporting faulty results or missing files.
What I’m saying is : “DON’T PANIC ; don’t limit yourself to the 5000 items barrier if indexing within 24 hours is good enough”
Onward !
Hopefully, I didn’t scare you too much here on the whole Sharepoint thing.
If you’re still planning to move your data to Microsoft’s cloud environment, keep reading on the entire process of migrating and what tools to use best in a next post.


 This will start downloading and installing all songs required for you to snipe your target.

 Plan
Plan  Remember our
  More prep !
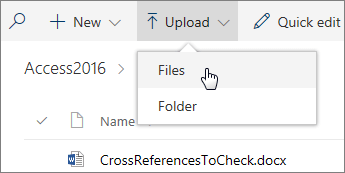

 Introducing “Sharepoint” is always a tricky one.
 I’ll also gladly push away some common misconceptions surrounding Sharepoint and its use, since potential users will start Googling and will eventually find articles that scare them away from this online platform.
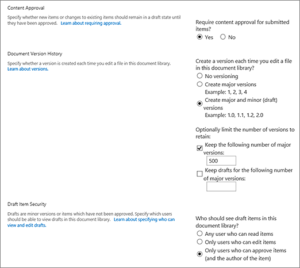
 First of all, keep in mind that Sharepoint is a collaboration platform. The essential part here is that one word : “collaboration“.
 In Sharepoint everything is divided into lists and libraries. Remember my database reference above ? Well, a list or library is nothing more than a database table.
 Should you go over the limit of 5000, the automatic indexing process simply becomes not-so-automatic and will take around 24 hours, depending on the process timing by Microsoft, which is something you yourself cannot change.