Sending M365 mail from your all-in-one scanner/printer

Precursor

Imagine the following : you recently migrated your mail platform from the “classic” POP/IMAP mailbox setup towards Microsoft 356’s mail solution.

If you’ve done the M365 setup correctly and migrated everything towards your new cloud environment (see tons of previous posts 😉) you’ll soon run into some issues when trying to send an e-mail from your super-cool all-in-one printer/scanner/copy/fax machine, which is hooked up to the network and ready to send scanned documents in your (domain) name.
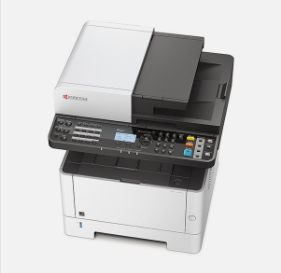
One of these issues being that you receive a NDR from your recipient relating to something like “Error 550 5.7.1 The user or domain that you are sending to (or from) has a policy that prohibited the mail that you sent” or anything basically that falls back to “we don’t trust this e-mail, because you smell of spam/phishing/malconfigured SMTP/…

Your printer – in this example – still has port 25 and (for instance) uit.telenet.be as outgoing mail server (yes, I’m Belgian – hence the .be TLD on my site)

(PS : don’t want to read this entire story ? CTRL-F your way to “How do I set this thing up ?”)

Behind the scenes

What happened behind the scenes before and after your migration, concerning mail flow ?

Before your migration,

you used to have and old-school mail provider that allowed a lot.
Your recipients didn’t care much or already added your scanned mails with PDF’s in them in their white allow-list.
Maybe your mails got through, maybe they didn’t.

Your outgoing mail provider (let’s say it’s Telenet nv for the sake of the already mentioned example above) doesn’t really care what you send over their mail server, as long as you send it from an IP address on their network.

(a small note : at the time of this writing Telenet no longer accepts anonymous port 25; they need authentication through an @telenet.be address and use port 587 with TLS encryption)
(another small sidenote : Proximus still allows anonymous port 25 at this time *cough*)

Whatever the case, it would allow senders to send any mail they want from any e-mail address they want, as long as they use their own internet provider’s mail address.

After migrating to M365,

Microsoft kind of enforces you to add certain DNS records, before 100% completing the setup wizard of their Online Exchange offer.
✅ green ticks tick my own boxes as well, so as an OCD-enjoying IT guy, I can’t not complete this wizard :p

One of these records you have to create is an SPF record, which partly regulates the mail flow for your domain by defining. (more on the SPF record on [this page])
Microsoft is also kind enough to allow you to send over their own SMTP servers (good guy MS !!!) and provides certain regulations in order to be able to do so.

Server/Smart Host: smtp.office365.com
Port: 587
TLS/Start TLS: Enabled
Username/Email address and password: pretty obvi what this is….

In a perfect world, you’d be able to just enter these settings in your super-duper all-in-one printer and you’d be good to go. 👌

HOWEVER…

On the dreaded day of June 30, 2023 Microsoft disabled out-of-the-box support for a tiny little protocol we know as TLS.
Specifically, they disabled support for TLS 1.0 and 1.1 (fear not).
A lot of these printers use this “older” protocol and – as you might already guess – this complicates the entire sending-of-mail process.

Never fear, though !

Microsoft built in a backdoor/workaround in their own security enforcement and still allows you to send mails like you would in “days of olden”.


How do I set this thing up ?

We’ll take this random internet screenshot from the mail settings tab in an OKI printer as an example :
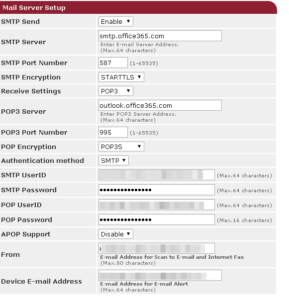
Following all instructions you find on the internet, this would be the way to go.
And it is.

Using these settings in 2024 will result in a “cannot send mail” error on the printer.

Did you misconfigure something on this printer ?
NO.

Here’s what you need to change on the Microsoft side :

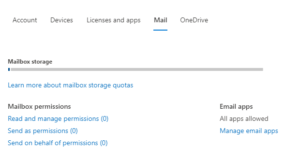
  • Through https://admin.microsoft.com browse your Users > Active Users and click the mail enabled user for your all-in-one device (Yes, you need to have a mail-enabled user for this)
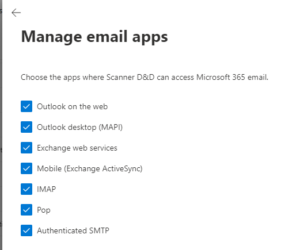
  • On the screen that appears on the right, go to the “Mail” tab and click “Manage email apps
  • By default “Authenticated SMTP” is not active.
    Activate it and press “save changes
  • That’s not where it stops, though.
    Microsoft, sneaky as they are, still disable SMTP AUTH on a more global level.
    So just activating the above, will result in the same sending error on your device.
    sooooo, let’s go to https://admin.exchange.microsoft.com for part 2 of the config.
  • On the Exchange Online admin center go to Settings (in the left) column and pick “Mail Flow” (not to be confused the the “Mail Flow” fold-out menu in the left column).
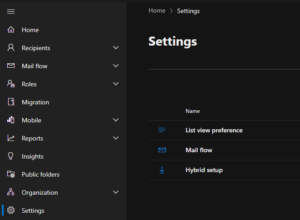
  • One thing that needs to be de-activated is the “Turn off SMTP AUTH protocol for your organization“. (the tick needs to be unticked – super confusing option – double negatives and all)
    Depending on the type of device, you may or may not need to opt-in the tick “Turn on use of legacy TLS clients“.
    Even though Micro$oft disabled TLS 1.0 and 1.1, they still allow older TLS versions to communicate with the SMTP AUTH endpoint “smtp.office365.com”.
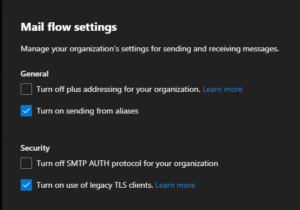
  • Press “Save”, give it a couple of hours tops and BAM, send at will with your Brother MFC something something, your mail enabled camera system, CRM software, …

I’ll leave the “plus addressing” tick for you to Google. It’s a cool feature, with little use-case.
Still cool though.

I haven’t talked about using an account that uses MFA, but more on the usage of “app passwords” later 😉

Peace out.
Happy mailing !

SMTP relay on your Windows server for use with Office 365

Antique software ? No TLS/SSL support for outgoing mail ?

No problem !

If you stumble upon this article through a Google search (who uses Bing, anyway…), you’re probably wondering how to solve the following issue (or something similar) :

It’s all about the Pentiums, baby !

You have this old invoicing software that doesn’t get updates anymore ever since 2008 and relies on port 25 – unauthenticated – to send mails through your ISP’s outgoing mail server.

You happen to have this beautiful product called ‘Office 365’ and use its mail functionality for your own domain name. This domain name is used as outgoing mail domain in your software.

Luckily, you still have a Windows Server randomly lying about (hopefully 2008 R2 or higher, but this trick works with older stuff as well – also : this works on a Windows 7/8/10 , even though the IIS install method will be different)

Installing SMTP in IIS

  1. 2012 R2 Server
    Install Internet Information Services (IIS)

    1. In Server Manager, select Add Roles.
    2. On the Before you begin page in the Add Roles Wizard, select Next.
    3. On the Select Installation Type page, select Role-based or Feature-based installation.
    4. On the Select destination server page, choose Select a server from the server pool, and select the server that will be running SMTP services. Select Next.
    5. On the Select Server Roles page, select Web Server (IIS), and then select Next. If a page that requests additional features is displayed, select Add Features and then select Next.
    6. On the Select Role Services page, make sure that Basic Authentication under Security is selected, and then select Next.
    7. On the Confirm Installation Steps page, select Install.

      Install SMTP

      1. Open Server Manager and select Add Roles and Features.
      2. Select Server Selection and make sure that the server that will be running the SMTP server is selected and then select Features.
      3. On the Select Features screen, choose SMTP Server. You may be prompted to install additional components. If that’s the case, select Add Required Features and select Next.
      4. Select Install. After the installation is finished, you may have to start the SMTP service by using the Services snap-in for the Microsoft Management Console (MMC).

  2. 2008 R2 Server
    Install Internet Information Services (IIS)

    1. In Server Manager, select Add Roles.
    2. On the Before you begin page in the Add Roles Wizard, select Next.
    3. On the Select Server Roles page, select Web Server (IIS) and select Install.
    4. Select Next until you get to the Select Role Services page.
    5. In addition to what is already selected, make sure that ODBC Logging, IIS Metabase Compatibility, and IIS 6 Management Console are selected and then select Next.
    6. When you’re prompted to install IIS, select Install. You may need to restart the server after the installation is finished.Install SMTP
      1. Open Server Manager and select Add Roles and Features.
      2. On the Select Features screen, choose SMTP Server. You may be prompted to install additional components. If that’s the case, select Add Required Features and select Next.
      3. Select Install. After the installation is finished, you may have to start the SMTP service by using the Services snap-in for the Microsoft Management Console (MMC).
  3. Windows 10 / 8 / 7Use the instructions on https://www.howtogeek.com/112455/how-to-install-iis-8-on-windows-8/
    You’re probably oing to need at least the ‘Professional’ version of the operating system to be able to pull this one off.

Configuring the SMTP Service for use with O365

  1. Set up SMTP
    1. Select Start > Administrative Tools > Internet Information Services (IIS) 6.0.
    2. Expand the current server, right-click the SMTP Virtual Server, and then select Properties.
    3. On the General tab, select Advanced > Add.
    4. In the IP Address box, specify the address of the server that’s hosting the SMTP server.
    5. In the Port box, enter 587 and select OK.
    6. On the Access tab, do the following:
      1. Select Authentication and make sure that Anonymous Access is selected.
      2. Select Connection > Only the List Below, and then specify the IP addresses of the devices that will be connecting to the SMTP server, such as printers.
      3. Select Relay > Only the List Below, and then specify the IP address of the devices relaying through this SMTP server
    7. On the Delivery tab, select Outbound Security, and then do the following:
      1. Select Basic Authentication.
      2. Enter the credentials of the Office 365 user who you want to use to relay SMTP mail.
      3. Select TLS Encryption.
      4. Select Outbound Connections and in the TCP Port box, enter 587 and select OK.
      5. Select Advanced and specify SMTP.office365.com as the Smart Host.

/!\ Restart the IIS service and the SMTP service.  /!\


Actually testing, before applying

You can test SMTP relay services without using your software that needed it in the first place.

To test SMTP relay services, use the following steps.

  1. Create a text file using Notepad or another text editor. The file should contain the following code. Replace the source and destination email addresses with the addresses you will use to relay SMTP.
    FROM: <source email address>
    TO: <destination email address>
    SUBJECT: Test email
    
    This is a test email sent from my SMTP server
    
  2. Save the text file as Email.txt.
  3. Copy the Email.txt file into the following folder: C:\InetPub\MailRoot\Pickup.
    Try to copy it instead of just moving it. The mail file will disappear.
  4. After a short time, the file should automatically be moved to the C:\InetPub\MailRoot\Queue folder. When the SMTP server delivers the mail, the file is automatically deleted from the local folder.

    Warning: If the SMTP server can’t deliver the message, a non-delivery report (NDR) is created in the C:\InetPub\MailRoot\BadMail folder. You can use this NDR to diagnose delivery issues.


Troubleshooting

This is where most guides fall short.

  1. Read the mails, that appear in the Badmail folder.Usually there will be a reason for refusal or non-delivery explained in these files.
    If you have ‘show file extensions’ turned on, they will appear as .BAD files.
    Open with Notepad or a similar pogram to see something like this :


    Self-explanatory, I guess.

  2. If mails were to actually arrive at their destinaton, but marked as “phishing” or appear in the spam folder of your recipient, chances are pretty high, your software package is still sending out through the wrong outgoing mailserver.
    Seeing as I’m not a psychic, I can’t know how to configure outgoing mail in every piece of software.Press F1 

    An other reason for your mails being marked as “phising” (and I deliberately left this near the end of this article), is also related to the above (still sending out through your ISP’s SMTP server using an Office 365 mail address).
    HOWEVER…

    When the mail arrives – even though its marked as spam –  this means your ISP was able to actually deliver it. In Office 365 cases, this usually means that your ISP is not allowed to send out as your O365-linked domain name.
    I’ll provide a detailed how-to on interpreting mail headers in a later post, but for the purpose of this exercise, let’s presume the mails are being marked because of the above.

    In this case, just adding/editing an SPF record that relates to your ISP will be enough.

    I hear a couple of muffled hillbilly-sounding voices in the background asking me ‘what in tarnation is an SPF record’ and how does that work ?
    Read and weep : https://blog.returnpath.com/how-to-explain-spf-in-plain-english/

    For all you Belgians out there, these are the values you need to include in your SPF record for the bigger ISP’s :

    Telenet
          include:_spf.telenet-ops.be

    Proximus
          include:ispmail.spf.secure-mail.be
          include:bgc.spf.secure-mail.be

    The somewhat attentive reader might be asking himself ‘if I could just add an SPF record using the records for my ISP, then why did I even bother reading this article ?

    I’ll keep the answer very simple : EVERY user of this ISP will have the ability to send mail as your domain name, without passing some form of verification in this case.

    AAaaaaand we’re back to the 80’s/90’s , where it was common fun and games to change your mail address in Outlook Express or other old mail software.

    Random :
    Did you know that Outlook Express’ executable file   msimn.exe was named, because it’s short for MicroSoft Internet Mail and News ?

  3. Mail does not arrive and the NDR gives an authentication error :

    Did you change your O365 password for the account that you use to authenticate for the SMTP connection ?
    Yes you did. (or you just made a typo)

  4. Mail does not arrive and the NDR gives a ‘does not permit to send as’ error :

    Most often, this occurs when not sending as the account that is the SMTP relayer.
    Your fancy 80’s software probably sends as (e.g., which is latin for exempli gratiā and is often translated as example given – just sayin’) invoicing@shortstraw.be, while your SMTP’er is oliver@shortstraw.be.

    To solve this, either change your outgoing mail address in your 80’s software, change the authenticating O365 in your SMTP relay server OR…. *drumrolls* add ‘send as’ permissions to the invoicing mailbox for Oliver’s account.

    What’s that ? invoicing@shortstraw.be does not exist in your O365 tenant ?
    Yeah… I figured as much…
    Add is as an alias to Oliver’s box or create a new box. Choice is yours.


Oh, and in a footnote : you will not find the mails sent through your relay’er in the resp. mailbox’ Sent Items.
Handy for troubleshooting… NOT