
Antique software ? No TLS/SSL support for outgoing mail ?
No problem !
If you stumble upon this article through a Google search (who uses Bing, anyway…), you’re probably wondering how to solve the following issue (or something similar) :
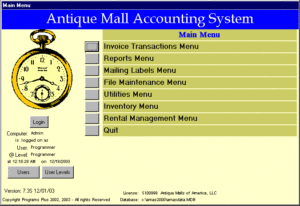
You have this old invoicing software that doesn’t get updates anymore ever since 2008 and relies on port 25 – unauthenticated – to send mails through your ISP’s outgoing mail server.
You happen to have this beautiful product called ‘Office 365’ and use its mail functionality for your own domain name. This domain name is used as outgoing mail domain in your software.
Luckily, you still have a Windows Server randomly lying about (hopefully 2008 R2 or higher, but this trick works with older stuff as well – also : this works on a Windows 7/8/10 , even though the IIS install method will be different)
Installing SMTP in IIS
- 2012 R2 Server
 Install Internet Information Services (IIS)
- In Server Manager, select Add Roles.
- On the Before you begin page in the Add Roles Wizard, select Next.
- On the Select Installation Type page, select Role-based or Feature-based installation.
- On the Select destination server page, choose Select a server from the server pool, and select the server that will be running SMTP services. Select Next.
- On the Select Server Roles page, select Web Server (IIS), and then select Next. If a page that requests additional features is displayed, select Add Features and then select Next.
- On the Select Role Services page, make sure that Basic Authentication under Security is selected, and then select Next.
- On the Confirm Installation Steps page, select Install.
Install SMTP- Open Server Manager and select Add Roles and Features.
- Select Server Selection and make sure that the server that will be running the SMTP server is selected and then select Features.
- On the Select Features screen, choose SMTP Server. You may be prompted to install additional components. If that’s the case, select Add Required Features and select Next.
-
Select Install. After the installation is finished, you may have to start the SMTP service by using the Services snap-in for the Microsoft Management Console (MMC).
- 2008 R2 Server
 Install Internet Information Services (IIS)
- In Server Manager, select Add Roles.
- On the Before you begin page in the Add Roles Wizard, select Next.
- On the Select Server Roles page, select Web Server (IIS) and select Install.
- Select Next until you get to the Select Role Services page.
- In addition to what is already selected, make sure that ODBC Logging, IIS Metabase Compatibility, and IIS 6 Management Console are selected and then select Next.
- When you’re prompted to install IIS, select Install. You may need to restart the server after the installation is finished.Install SMTP
- Open Server Manager and select Add Roles and Features.
- On the Select Features screen, choose SMTP Server. You may be prompted to install additional components. If that’s the case, select Add Required Features and select Next.
- Select Install. After the installation is finished, you may have to start the SMTP service by using the Services snap-in for the Microsoft Management Console (MMC).
- Windows 10 / 8 / 7Use the instructions on https://www.howtogeek.com/112455/how-to-install-iis-8-on-windows-8/
You’re probably oing to need at least the ‘Professional’ version of the operating system to be able to pull this one off.
Configuring the SMTP Service for use with O365
- Set up SMTP
- Select Start > Administrative Tools > Internet Information Services (IIS) 6.0.
- Expand the current server, right-click the SMTP Virtual Server, and then select Properties.
- On the General tab, select Advanced > Add.
- In the IP Address box, specify the address of the server that’s hosting the SMTP server.
- In the Port box, enter 587 and select OK.
- On the Access tab, do the following:
- Select Authentication and make sure that Anonymous Access is selected.
- Select Connection > Only the List Below, and then specify the IP addresses of the devices that will be connecting to the SMTP server, such as printers.
- Select Relay > Only the List Below, and then specify the IP address of the devices relaying through this SMTP server
- On the Delivery tab, select Outbound Security, and then do the following:
- Select Basic Authentication.
- Enter the credentials of the Office 365 user who you want to use to relay SMTP mail.
- Select TLS Encryption.
- Select Outbound Connections and in the TCP Port box, enter 587 and select OK.
- Select Advanced and specify SMTP.office365.com as the Smart Host.
/!\ Restart the IIS service and the SMTP service. /!\
Actually testing, before applying
You can test SMTP relay services without using your software that needed it in the first place.
To test SMTP relay services, use the following steps.
- Create a text file using Notepad or another text editor. The file should contain the following code. Replace the source and destination email addresses with the addresses you will use to relay SMTP.
FROM: <source email address>
TO: <destination email address>
SUBJECT: Test email

This is a test email sent from my SMTP server
- Save the text file as Email.txt.
- Copy the Email.txt file into the following folder: C:\InetPub\MailRoot\Pickup.
Try to copy it instead of just moving it. The mail file will disappear. - After a short time, the file should automatically be moved to the C:\InetPub\MailRoot\Queue folder. When the SMTP server delivers the mail, the file is automatically deleted from the local folder.
Warning: If the SMTP server can’t deliver the message, a non-delivery report (NDR) is created in the C:\InetPub\MailRoot\BadMail folder. You can use this NDR to diagnose delivery issues.
Troubleshooting
This is where most guides fall short.
- Read the mails, that appear in the Badmail folder.Usually there will be a reason for refusal or non-delivery explained in these files.
If you have ‘show file extensions’ turned on, they will appear as .BAD files.
Open with Notepad or a similar pogram to see something like this :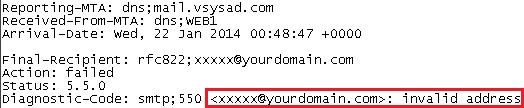
Self-explanatory, I guess. - If mails were to actually arrive at their destinaton, but marked as “phishing” or appear in the spam folder of your recipient, chances are pretty high, your software package is still sending out through the wrong outgoing mailserver.
Seeing as I’m not a psychic, I can’t know how to configure outgoing mail in every piece of software.Press F1
An other reason for your mails being marked as “phising” (and I deliberately left this near the end of this article), is also related to the above (still sending out through your ISP’s SMTP server using an Office 365 mail address).
HOWEVER…When the mail arrives – even though its marked as spam – this means your ISP was able to actually deliver it. In Office 365 cases, this usually means that your ISP is not allowed to send out as your O365-linked domain name.
I’ll provide a detailed how-to on interpreting mail headers in a later post, but for the purpose of this exercise, let’s presume the mails are being marked because of the above.In this case, just adding/editing an SPF record that relates to your ISP will be enough.
I hear a couple of muffled hillbilly-sounding voices in the background asking me ‘what in tarnation is an SPF record’ and how does that work ?
Read and weep : https://blog.returnpath.com/how-to-explain-spf-in-plain-english/For all you Belgians out there, these are the values you need to include in your SPF record for the bigger ISP’s :
Telenet
include:_spf.telenet-ops.beProximus
include:ispmail.spf.secure-mail.be
include:bgc.spf.secure-mail.beThe somewhat attentive reader might be asking himself ‘if I could just add an SPF record using the records for my ISP, then why did I even bother reading this article ?
I’ll keep the answer very simple : EVERY user of this ISP will have the ability to send mail as your domain name, without passing some form of verification in this case.
AAaaaaand we’re back to the 80’s/90’s , where it was common fun and games to change your mail address in Outlook Express or other old mail software.
Random :
Did you know that Outlook Express’ executable file msimn.exe was named, because it’s short for MicroSoft Internet Mail and News ? - Mail does not arrive and the NDR gives an authentication error :
Did you change your O365 password for the account that you use to authenticate for the SMTP connection ?
Yes you did. (or you just made a typo) - Mail does not arrive and the NDR gives a ‘does not permit to send as’ error :
Most often, this occurs when not sending as the account that is the SMTP relayer.
Your fancy 80’s software probably sends as (e.g., which is latin for exempli gratiā and is often translated as example given – just sayin’) invoicing@shortstraw.be, while your SMTP’er is oliver@shortstraw.be.To solve this, either change your outgoing mail address in your 80’s software, change the authenticating O365 in your SMTP relay server OR…. *drumrolls* add ‘send as’ permissions to the invoicing mailbox for Oliver’s account.
What’s that ? invoicing@shortstraw.be does not exist in your O365 tenant ?
Yeah… I figured as much…
Add is as an alias to Oliver’s box or create a new box. Choice is yours.
Oh, and in a footnote : you will not find the mails sent through your relay’er in the resp. mailbox’ Sent Items.
Handy for troubleshooting… NOT